Why Do Roof Leaks Usually Start Around Chimneys and Vent Pipes?
Roof leaks frequently start around chimneys and plumbing vent pipes because structural penetrations interrupt the roof's continuous water-shedding plane and endure constant thermal movement. Chimney flashing and vent pipe boots can be repaired and replaced without installing a new roof, as long as surrounding shingles remain pliable and the underlying roof decking is structurally sound. A proper repair involves carefully removing adjacent shingles, stripping failed metal and dried sealant down to the deck, installing a self-adhering ice-and-water barrier, fitting new step and counter-flashing or a heavy-duty vent boot, and re-securing the shingle courses.
When a roof fails, it rarely begins in the center of an uninterrupted field of shingles. Penetrations force vertical surfaces to interface with sloped horizontal roof planes, requiring custom metal transitions and mechanical seals to redirect cascading water.
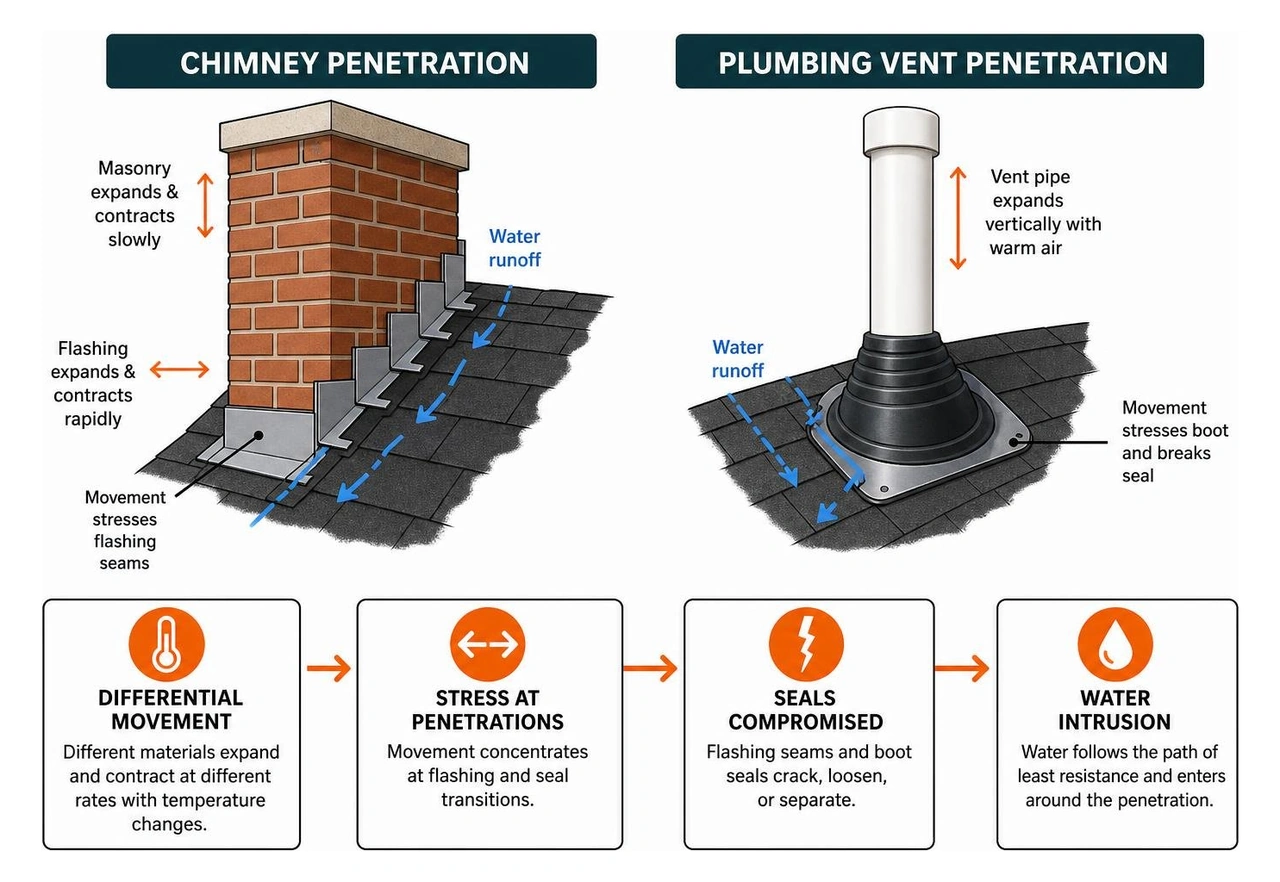
The primary reason these penetrations are vulnerable comes down to thermal dynamics and physics. Different building materials expand and contract at vastly different rates:
- Masonry chimneys expand and contract slowly with temperature changes, but absorb surface moisture.
- Sheet metal flashing expands and contracts rapidly when exposed to direct sunlight and freezing temperatures.
- PVC and ABS vent stacks expand vertically as warm indoor air and wastewater vent through the roof.
- Plywood or OSB roof decking shifts, swells, and flexes with seasonal humidity variations.
In Central Wisconsin, roofs endure annual temperature swings spanning over 100°F alongside dozens of freeze-thaw cycles every winter and spring. This differential movement places continuous physical shear stress on the sealants, fasteners, and overlapping metal joints connecting your chimney or vent pipe to the roof structure.
Furthermore, roof geometry naturally funnels large volumes of runoff directly against these penetrations. A chimney projecting out of a sloped roof acts like a dam, obstructing the downward path of water and creating concentrated drainage channels along its sides. When winter brings heavy snowpack, meltwater pools behind chimneys or around vent pipes, while wind-driven precipitation can drive water upward beneath unsealed metal joints. If you are currently dealing with an unexpected roof leak in heavy rain, the underlying culprit is often a broken seal at one of these critical junction points.
The Layered Components of Chimney Flashing Systems
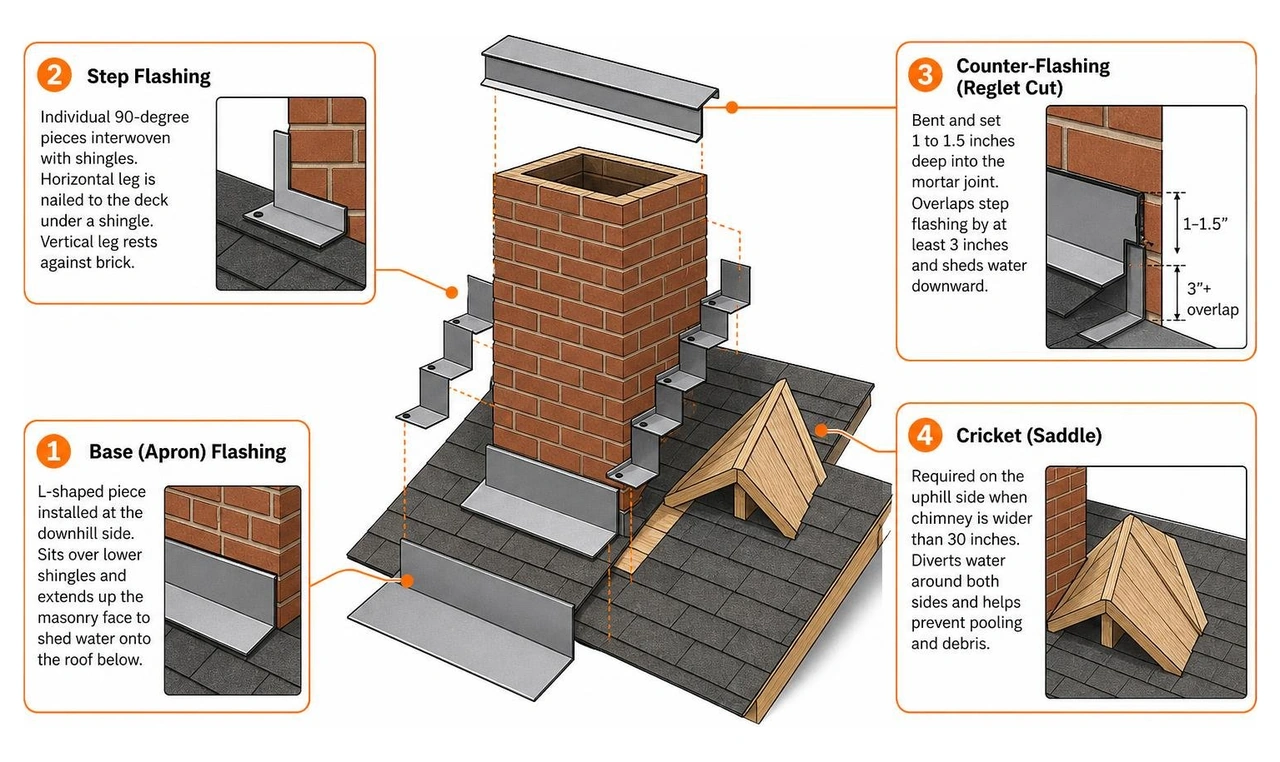
A weather-resistant chimney seal does not rely on a single piece of metal or a bead of caulk. It requires a dynamic, two-part layered system designed to allow the chimney and the roof framing to move independently without breaking the water barrier:
- Base (Apron) Flashing: Installed at the downhill side of the chimney, this L-shaped metal piece sits over the lower shingles and extends up the masonry face to shed water cleanly onto the roof surface below.
- Step Flashing: Along the sloped sides of the chimney, individual 90-degree metal pieces (typically 8x8 inches bent in half) are interwoven into each shingle course. The horizontal leg is nailed to the roof deck under a shingle, while the vertical leg rests flat against the brickwork without being nailed to it.
- Counter-Flashing (Cap Flashing): Installed directly above the step and base flashing, counter-flashing is bent and set 1 to 1.5 inches deep into the chimney's horizontal mortar joints (known as a reglet joint). It hangs downward, overlapping the vertical legs of the step flashing by at least 3 inches. When the house settles or shifts, the step flashing slides freely underneath the counter-flashing while shedding water downward.
- Cricket (Saddle): When a chimney is wider than 30 inches on the uphill roof slope, the International Residential Code (IRC) mandates the installation of a cricket. A cricket is a miniature peaked roof structure framed on the uphill side of the chimney to divide the flow of water and guide it around both sides of the masonry, preventing pooling and debris collection.
How Plumbing Vent Boot Assemblies Function
Plumbing vent pipes operate on a simpler but equally critical mechanical principle. A vent boot consists of a wide flat metal or plastic base flange topped with a flexible, weather-tight collar ring made of neoprene, EPDM rubber, or malleable lead.
The integrity of a vent boot depends on precise flange sequencing. The bottom and lower sides of the boot flange must rest on top of the shingles below the pipe, while the top half and upper sides must be tucked beneath the overlapping shingle courses above. Water running down the roof flows over the upper shingles, crosses onto the boot flange, routes around the pipe collar, and drains onto the lower shingles. However, flexible elastomer collars face constant exposure to ultraviolet (UV) radiation and severe temperature fluctuations, which eventually degrade the synthetic rubber and lead to micro-fractures around the pipe seal.
What Are the Most Common Failure Modes for Flashing Systems?
Flashing systems rarely fail all at once; they deteriorate through specific, identifiable failure mechanisms. Recognizing these modes helps pinpoint the exact source of water intrusion before it causes extensive structural damage.
Plumbing vent pipe flashings commonly experience four primary failure modes:
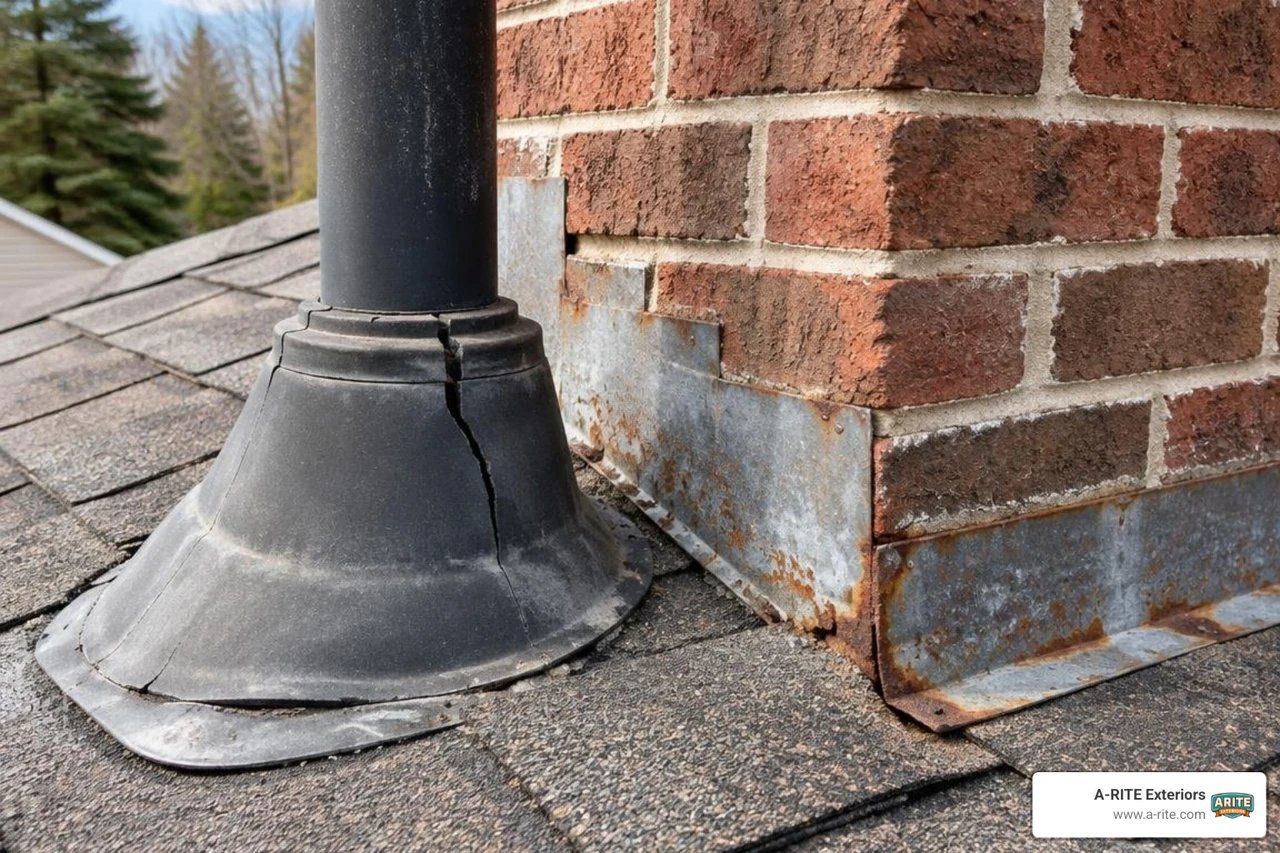
- Cracked Rubber Collars: Sunlight and temperature swings cause neoprene and EPDM collars to lose plasticizers, dry out, crack, and tear away from the pipe stack, allowing water to follow the exterior of the pipe directly into the attic.
- Lifted or Warped Base Flanges: Fasteners that back out due to thermal deck movement allow the metal or plastic base plate to cup or lift, permitting wind-driven rain to blow beneath the flange.
- Degraded Perimeter Sealants: Surface sealants applied around the perimeter dry out, peel, and separate over time.
- Corroded Vent Stacks or Cast-Iron Rust: In older installations, cast-iron plumbing pipes can develop rust scale that separates the collar from the pipe wall.
Chimney flashing assemblies experience six distinct failure modes:
- Dried Polyurethane or Butyl Sealant at the Reglet: The flexible sealant injected into the mortar groove hardens, shrinks, and detaches from the brick or metal, letting water run behind the counter-flashing.
- Cracked Mortar Reglet Joints: Freeze-thaw cycles cause the mortar around the embedded counter-flashing edge to spall and crumble, loosening the metal attachment.
- Missing Counter-Flashing: In sub-standard installations, contractors sometimes skip counter-flashing entirely and rely solely on exposed step flashing nailed and caulked against the brick surface.
- Separated or Rusted Step Flashing: Corroded galvanized metal develops pinholes, or improper nailing causes the metal pieces to pull away from the roof plane.
- Masonry Cracks Above the Flashing Line: Water entering porous brick, cracked chimney crowns, or failing mortar joints high on the chimney can travel downward inside the masonry and exit into the attic below the flashing line.
- Missing or Undersized Crickets: On wide chimneys without a proper cricket, water, pine needles, and snow accumulate on the uphill side, causing pooling water to rise above the height of the rear base flashing.
When moisture breaches these flashing points, it slowly saturates insulation, softens sheathing, and rusts fasteners. Homeowners can look for telltale indicators by reviewing signs of hidden roof damage. Left unresolved, internal rot and drywall repairs can cost thousands of dollars, and severe cases can cost much more.
Rubber Boots vs. Metal Flashing Lifespans
Rubber vent boot collars often wear out before the shingles around them do.
| Flashing Material / Component | Resistance to Freeze-Thaw & UV | Best Application |
|---|---|---|
| Standard Neoprene / EPDM Vent Boot | Moderate (degrades under intense UV) | Budget-conscious standard plumbing stacks |
| All-Metal / Silicone High-Grade Boot | High (silicone resists UV & extreme cold) | Long-term roof integration matching shingle life |
| Malleable Lead Boot Flange | Very High | Historic, heavy-duty, or long-life roofing |
| Galvanized Steel Flashing | Moderate (susceptible to rust in humid climates) | Standard step and base flashing |
| Aluminum Flashing (0.019"+) | High (rust-proof, easy to form cleanly) | Residential step, base, and counter-flashing |
| Heavy-Gauge Copper Flashing | Very high (highly corrosion resistant) | Premium, historic, or lifetime masonry systems |
For long-lasting performance in northern climates, upgrading to high-grade silicone collar assemblies, all-metal boots, or heavy-gauge copper and aluminum flashing prevents premature failures between roof replacement cycles.
Can Flashing Be Replaced Without Installing a Brand-New Roof?
A damaged chimney flashing or leaking vent pipe boot can be fully removed and replaced without replacing the entire roof system. When the surrounding asphalt shingles remain flexible and the underlying roof decking is dry and solid, performing an isolated flashing replacement is an established and sensible repair technique.
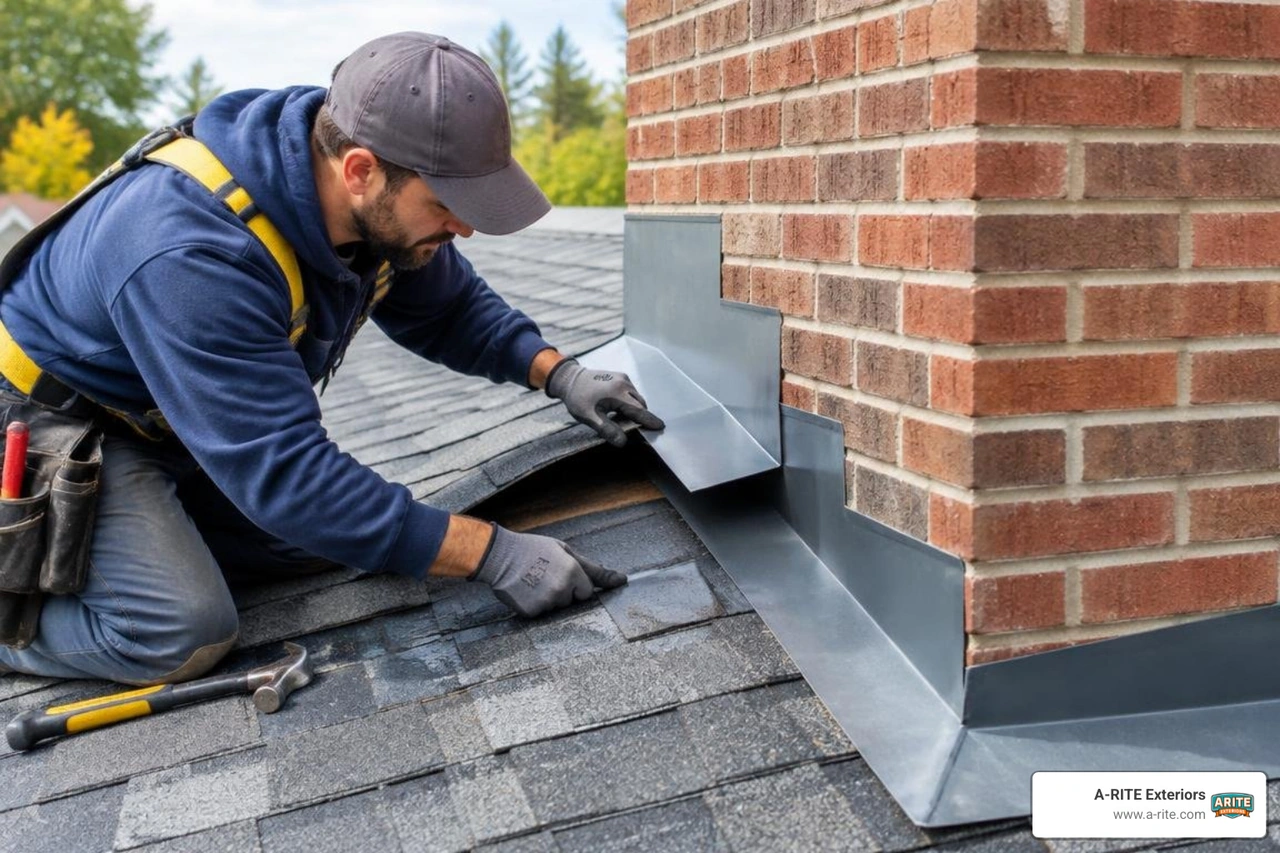
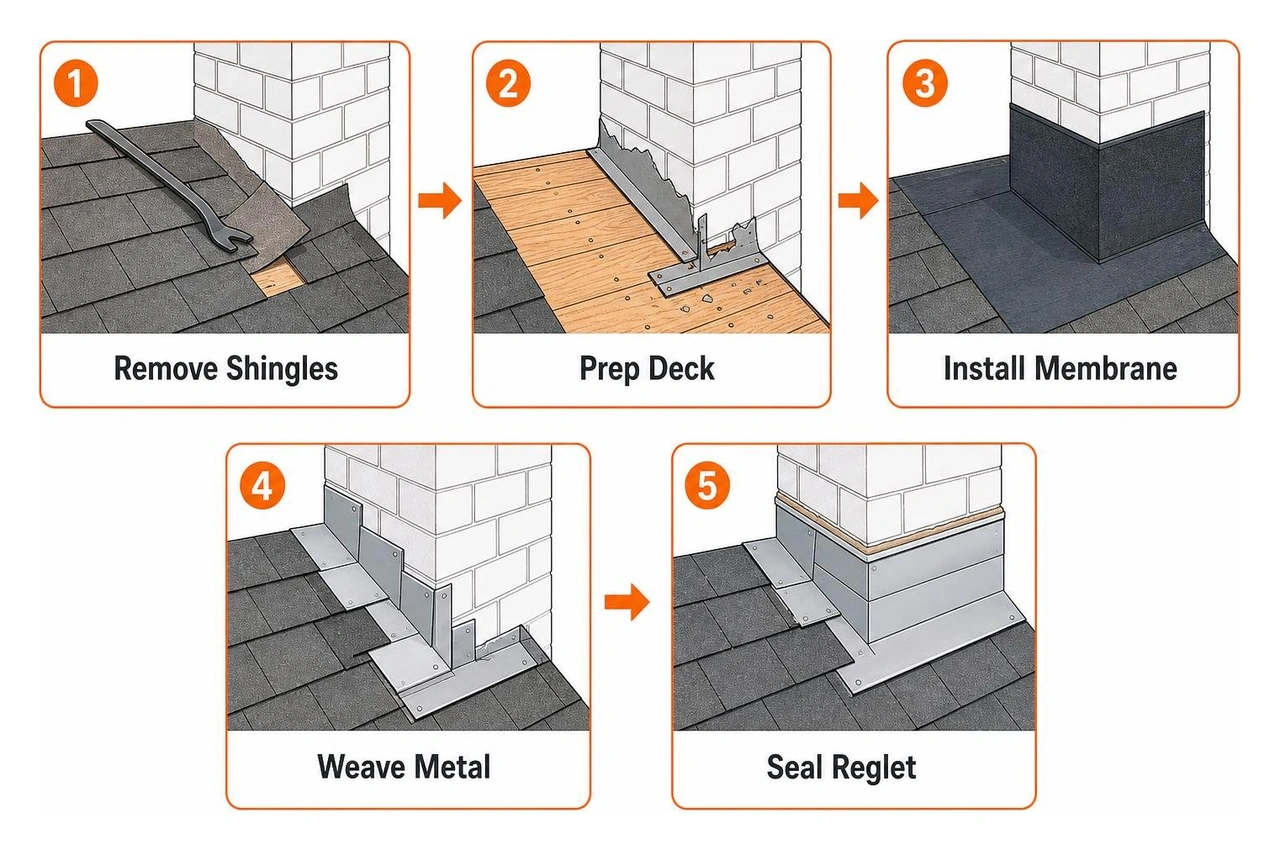
A proper chimney flashing repair or vent boot replacement typically includes a methodical, multi-step process:
- Protecting the Shingles: The work area is opened carefully so nearby shingles can be reused where their condition allows.
- Clearing Out Worn Components: Damaged flashing, failed vent boots, and deteriorated sealant are removed so the roof deck and sheathing can be checked for moisture damage or weakened areas.
- Adding a Secondary Water Barrier: A self-adhering membrane is placed over the exposed deck and turned up the chimney wall or fitted tightly around the vent stack to reinforce the water-shedding layers.
- Integrating Replacement Flashing: Chimney step flashing is woven into the shingle courses and secured to the roof deck, while a replacement vent boot is slid beneath the upper shingles so water sheds over its flange.
- Finishing the Chimney Transition: Where counter-flashing is needed, the mortar joint is prepared for new metal that overlaps the step flashing and is sealed at the joint with a compatible roofing sealant.
- Restoring the Shingle Courses: The surrounding shingles are fastened and sealed back into place to restore the roof’s layered drainage path.
This methodical installation creates a weather-tight seal that restores total system integrity. Temporary "tar-and-caulk" patches smeared over old metal break down quickly under seasonal temperature swings and often trap moisture underneath. For lasting protection, explore our specialized roof repair services.
When Flashing Issues Require a Full Roof Replacement
While targeted flashing replacement is practical in many cases, certain roof conditions make localized repairs unfeasible:
- Brittle, Aging Shingles: When asphalt shingles reach the end of their functional lifespan, they lose volatile oils and become brittle. Attempting to lift and un-nail shingles around a chimney will cause them to snap, crack, and lose protective mineral granules, creating new leak points.
- Widespread Roof Deck Rot: If a flashing leak went unnoticed for years, water intrusion may have rotted substantial portions of the roof sheathing, rafter tails, or structural framing. Correcting structural wood rot requires stripping extensive sections of roofing.
- Multiple Failing Roof Penetrations: When flashing, valleys, and shingle fields show widespread deterioration, isolated patches become impractical.
Homeowners weighing their options can read our guide on how to know if your roof needs to be replaced or just repaired. Understanding why roof underlayment and decking matter helps clarify when a targeted fix is sufficient or when choosing full residential roof replacement is the smarter long-term investment.
How Can Homeowners Diagnose Where a Roof Leak Is Originating?
Because water can travel along rafters, trusses, and ceiling joists before dripping through drywall, the point where water stains appear inside your living room or bedroom is rarely directly below the exterior penetration. A structured diagnostic approach helps determine the true origin of a leak.
Step 1: Attic Daylight Inspection
Access your attic during daylight hours with a high-lumen flashlight. Turn off the light to look for visible daylight around chimney framing and plumbing vent pipes. Switch on your light to inspect the wood rafters, roof sheathing, and chimney chase framing for:
- Dark, blackish water stains or discolored drip trails along rafters.
- Rusted nail shanks protruding through the roof deck.
- Damp, compressed, or discolored attic insulation.
Step 2: The Controlled Sunny-Day Water Test
If the exact source remains unclear, a qualified roofer can conduct an isolated water test on a dry, sunny day. Homeowners should not climb onto the roof to perform this test.
- The roofer monitors the penetration from the attic with a flashlight or coordinates with a second trained professional inside the attic.
- The roofer applies water at low pressure only around the base of the plumbing pipe boot or lower chimney flashing for 5 to 10 minutes.
- The roofer then works the hose upward, soaking the step flashing along the sides, then the counter-flashing reglet joint, and finally the upper masonry and chimney crown.
- Testing one area at a time, from the bottom up, pinpoints which layer allows water infiltration.
Step 3: Differentiating Flashing Leaks from Masonry and Cap Failures
Not every chimney leak is caused by flashing. You can narrow down the cause using these observations:
- Flashing Failure: Water drips rapidly during heavy rainstorms, and water staining is concentrated on the roof deck and rafters immediately surrounding the chimney penetration.
- Cracked Chimney Crown or Chase Cover: Water drips inside the fireplace firebox or down the center of the flue tiles, often accompanied by efflorescence (white mineral salts) inside the home.
- Porous Masonry or Mortar Spalling: Moisture seeps slowly through exterior walls hours after rain begins, dampening ceiling drywall adjacent to the chimney breast.
If you are evaluating water marks in your home, read our guide on whether you should worry about a small roof leak.
Proper attic performance also plays an essential role in moisture control. Warm indoor air leaking into cold attics can condense on roof penetrations, mimicking a roof leak or contributing to heavy winter ice dams. Homeowners may qualify for Focus on Energy rebates. These rebates are for qualifying insulation and air-sealing work (such as attic insulation, air sealing, wall insulation, foundation insulation, duct sealing, and qualifying DIY attic insulation and air sealing), not for roof replacement itself. Rebate amounts and eligibility rules change over time, so homeowners should confirm current program rules before starting work.
At A-RITE Exteriors, we provide dedicated attic insulation services tailored to optimize overall roof system performance and moisture management. Regarding federal tax incentives, Section 25C was available for qualifying improvements placed in service through December 31, 2025; homeowners should consult a tax professional for current tax guidance.
Note: Total roof replacement investments depend on roof size, pitch, number of layers, decking condition, materials, and labor.
A lower price may reflect differences in materials, scope, cleanup, warranty coverage, or installation details.
What Should You Look for When Hiring a Contractor for Flashing Repairs?
Flashing repairs require precision sheet metal craftsmanship and a deep understanding of water dynamics. When vetting contractors to repair or replace your roof flashing, keep these essential criteria in mind:
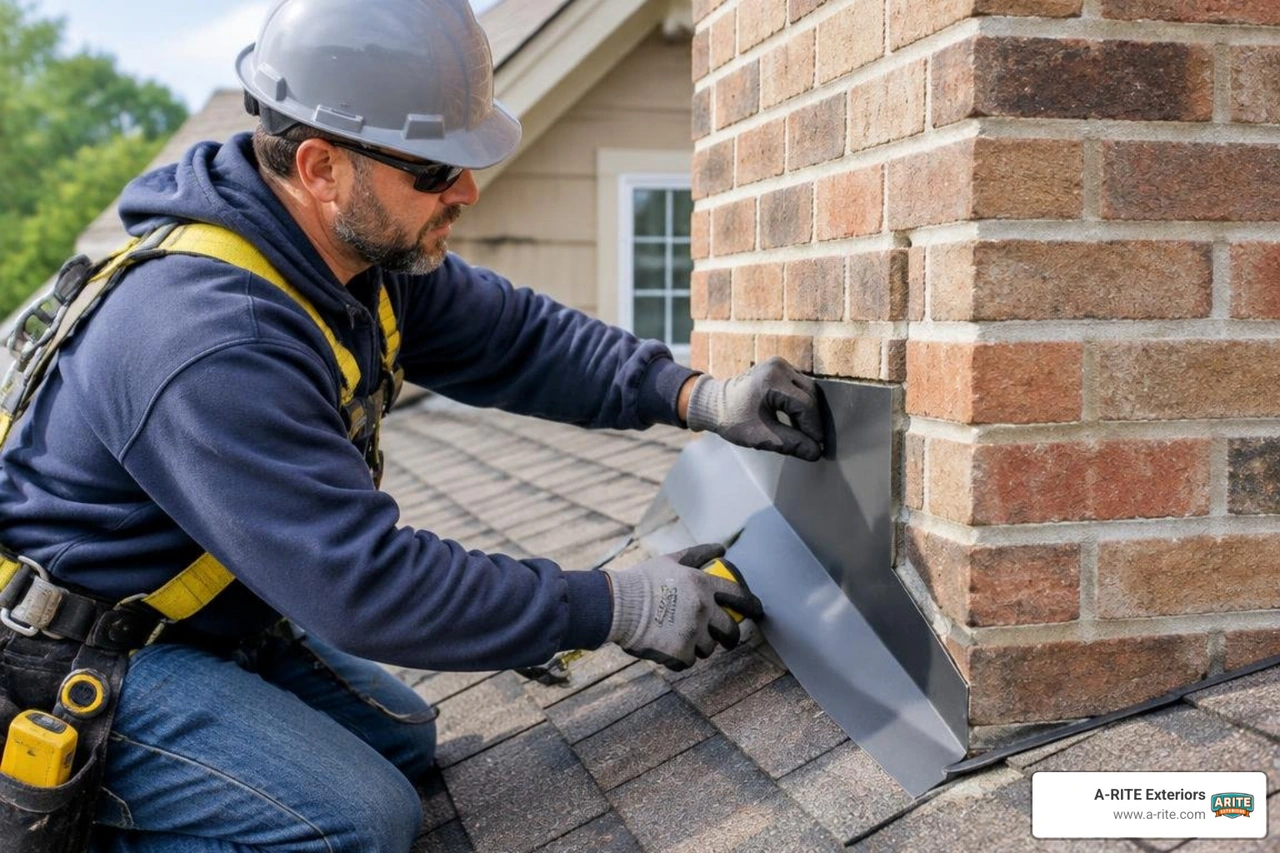
- Mechanical Interlocking Over Surface Caulking: Ask the contractor how they secure counter-flashing to masonry. If they propose simply fastening metal flat against the brick and covering the top edge with caulk, reject the proposal. A long-lasting installation requires cutting a mechanical reglet groove into the mortar joint.
- Commercial-Grade Metal Specifications: Ensure the contractor uses heavy-gauge aluminum (minimum 0.019 inch), galvanized steel, or copper rather than thin, generic roll coil.
- Comprehensive Underlayment Details: Verify that the scope of work includes installing a self-adhering ice-and-water membrane underneath the new metal components.
- Clear Workmanship Warranty Coverage: Request a written warranty that covers labor and leak-free performance, not merely manufacturer material warranties.
To assist in your search, consult our roofing contractor selection guide and review what is included in a professional roof replacement estimate.
A-RITE offers financing through Service Finance, and example terms are available on its financing page. Financing is subject to credit approval. Financing options are available for qualifying homeowners. Loan amounts up to $100,000 unsecured may be available, with final approval, rates, and terms based on lender review and credit qualification.
Frequently Asked Questions About Chimney and Vent Flashing
Why shouldn't I just use silicone caulk or roofing tar to seal a flashing leak?
Using silicone caulk or roofing tar as a primary fix creates short-lived results and long-term problems. Silicone does not bond effectively to oxidized metal or asphalt shingle granules, causing it to peel under UV exposure and thermal cycling. Asphalt mastic and black roof tar harden, dry out, crack, and trap moisture against masonry, accelerating brick spalling and rotting the underlying wood decking. Furthermore, thick layers of dried tar must be scraped down to bare wood before a proper flashing system can be installed, which increases future labor costs.
How long should a professional chimney flashing replacement last?
When installed by experienced professionals using proper methods, a chimney flashing replacement should last as long as the rest of the roof. Sealant in the reglet joint may need resealing over time as it weathers.
Conclusion: How Can You Protect Your Roof Penetrations From Costly Leaks?
Chimneys and plumbing vent pipes are some of the most common places for roof leaks to start, but discovering a leak around a penetration does not mean you are forced into an expensive full roof replacement. When surrounding shingles are pliable and the structural deck is sound, a precision flashing rebuild provides an effective, long-lasting solution that protects your home for decades.
Addressing a failing boot or deteriorated chimney flashing early prevents minor moisture intrusion from escalating into structural wood rot, ruined insulation, and costly drywall damage.
If you suspect a flashing failure or notice water stains around your chimney or plumbing stacks, contact our team at A-RITE Exteriors. We serve homeowners across Central Wisconsin with roof-first, weather-resistant exterior solutions built to handle harsh northern winters and severe storms. Contact us today to schedule a comprehensive roof inspection and protect your home with lasting craftsmanship.