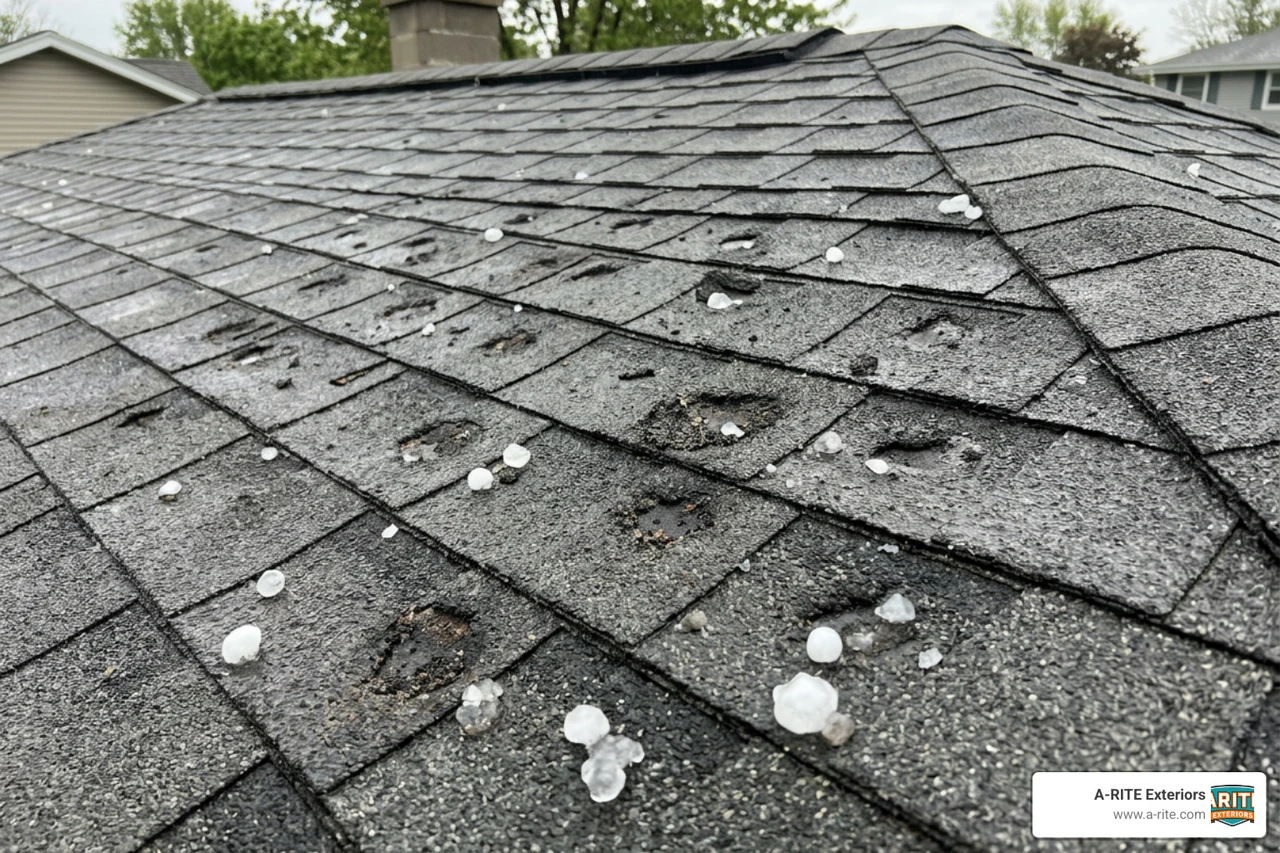
What Hail Damage on Shingles Actually Looks Like: Why It Matters
Knowing how to spot hail damage shingles is one of the most important things you can do after a storm rolls through Central Wisconsin. Hail can look harmless from the ground, but even a short burst of quarter-sized stones can quietly compromise your roof's ability to protect your home for years to come.
Here is what hail damage on shingles typically looks like:
| Sign | What You See | Where to Look |
|---|---|---|
| Granule loss | Dark, bald circles on shingles | Roof surface, gutters, downspouts |
| Soft bruising | Spongy feel when pressed, like a bruised apple | Asphalt shingles on the roof |
| Exposed mat | Shiny or black asphalt showing through | Where granules are knocked off |
| Random impact pattern | No uniform direction or spacing | Scattered across multiple roof slopes |
| Dented soft metals | Dings on gutters, vents, AC fins | Ground level, which is easiest to spot first |
The tricky part is that hail damage rarely causes an immediate leak. Instead, it strips away the protective granules on your shingles, exposes the underlying asphalt to UV rays, and quietly shortens your roof's lifespan by years, sometimes without a single water stain appearing inside for 12 to 18 months.
That delay is exactly why so many Wisconsin homeowners miss it until the damage is far worse.
I'm Bryan Londerville, founder of A-RITE Exteriors, and since 2002 I've helped Central Wisconsin homeowners document and navigate how to spot hail damage shingles (from subtle granule loss to insurance test squares) across thousands of roof inspections. In this guide, I'll walk you through every step of the process so you can assess your roof confidently, protect your home, and make smart decisions before a small problem becomes a costly one.

Basic how to spot hail damage shingles glossary:
Ground-Level Indicators: Spotting Storm Damage Safely
Before you even think about grabbing a ladder, the safest and most effective way to start your inspection is with your feet planted firmly on the ground. When severe weather strikes communities like Wausau, Stevens Point, or Minocqua, we always advise homeowners to look for "collateral damage" first.
Collateral damage refers to the dented, chipped, or broken items around your yard and the exterior of your house. Because soft metals and plastics show hail impacts much more easily than tough roofing materials, they serve as a reliable "hail witness" to confirm the storm's severity.

Here is your ground-level checklist to review before calling in the professionals:
- Gutter Dents and Downspout Dings: Walk around the perimeter of your home and inspect your aluminum gutters and downspout pipes. Hailstones leave round, dimpled impressions on these soft metals. Pay close attention to the downspout elbows.
- Window Screens and Sills: Look for tears, punctures, or circular stretching in your window screens. Inspect painted wood or vinyl windowsills for fresh chips, dents, or cracks.
- Air Conditioner Condenser Fins: Walk over to your outdoor HVAC unit. The soft aluminum cooling fins are highly sensitive. Heavy hail will flatten or dent these fins, which can restrict airflow and damage your system over time.
- Siding and Trim Damage: Check your vinyl, aluminum, or wood siding. Hail driven by strong Midwestern winds can crack vinyl, dent aluminum, or leave star-shaped fracture marks in painted finishes.
- Shredded Vegetation and Stripped Leaves: Look at your landscaping. If your flowerbeds are beaten down, tree branches are snapped, and leaves are completely stripped from your trees, it is a clear sign that high-energy hail impacted your property.
- Granule Accumulation in Downspouts: Check the discharge areas of your gutter downspouts. Finding a heavy, sand-like pile of dark mineral granules indicates that your shingles took a severe beating and are shedding their protective coatings.
By documenting these signs, you build a strong foundation for any future conversations with your insurance company. For a more detailed breakdown of these early warning signs, read our article on Identifying 4 Common Signs of Hail Damage.
How to Spot Hail Damage Shingles by Material Type
Not all roofs react to hail in the same way. The age, design, and exact material of your roofing system play massive roles in how impacts manifest. Whether your home features standard asphalt shingles or premium metal panels, understanding these material-specific signatures is key to knowing how to spot hail damage shingles correctly.
Asphalt and Composition Shingles
Asphalt shingles are the most common roofing material in Central Wisconsin. They are constructed in three layers: a fiberglass or organic mat, a water-resistant asphalt coating, and a top layer of ceramic mineral granules.
When hail strikes, it forces the granules into the asphalt or knocks them loose entirely, exposing the dark fiberglass mat underneath. These impacts appear as random, circular dark spots that feel soft and spongy to the touch, which is very similar to pressing your thumb into a bruised apple. Over time, sunlight and harsh winter weather degrade this exposed mat, making it brittle and prone to cracking.
Wood Shakes and Shingles
Our historic homes and rustic cabins in places like Tomahawk or Lac du Flambeau often feature beautiful cedar shakes. When hail hits wood, it causes physical splits and cracks.
To tell if a split is from a recent hailstorm or natural aging, look at the color and edges. A fresh, storm-induced split will expose bright, light-colored orange or brown wood inside the crack, and the edges will be sharp and clean. Natural weathering splits, on the other hand, follow the grain of the wood, look gray and oxidized, and have rounded, worn edges. You may also see small, round compression dents where the hailstones physically bruised the wood fibers.
Metal Roofing
Metal roofs are exceptionally durable, but they are not entirely immune to storms. Hail impacts on metal panels typically cause cosmetic dimples or shallow dents. While these dents rarely cause a metal roof to leak, they can affect your home's curb appeal.
To spot subtle dings on a metal roof, professional inspectors often run a piece of chalk flat across the metal surface. The chalk coats the flat areas but leaves the indentations bare, revealing the exact pattern of the hail strikes.
Clay and Concrete Tiles
While less common in our region, tile roofs are highly vulnerable to cracking and chipping from larger hail. Impacts typically result in sharp, clean fractures, star-shaped cracks, or broken corners where a stone clipped the edge of a tile.
Slate Roofing
Slate is incredibly tough but brittle. Hail stones can crack individual slates or break them completely loose from their metal fasteners. These cracks are usually random and do not follow the natural cleft or grain of the stone.
For a deeper dive into how hail interacts with various roof types and how to navigate the financial implications, refer to this comprehensive GAF's guide on storm damage.
Here is a quick reference table to help you identify damage signatures across different materials:
| Roofing Material | Primary Hail Damage Signature | Secondary Indicators |
|---|---|---|
| Asphalt Shingles | Circular granule loss, soft tactile bruising, exposed fiberglass mat | Lifted tabs, cracked shingle edges |
| Wood Shakes | Sharp, bright-colored splits with clean edges along the grain | Round compression dents, split corners |
| Metal Panels | Shallow, circular dimples or deep dents in the metal | Scuffed or chipped paint finishes |
| Clay / Concrete | Star-shaped fractures, clean chips, broken corners | Loose or sliding tile pieces |
| Slate | Clean, random cracks, broken slates sliding out of place | Damaged or exposed metal fasteners |
Choosing the right material for your home's next roof is a balance of style and durability. If you are considering a replacement, explore our guide on Dark vs Light Shingles Which Is Right for Your Home to find the perfect match for your Wisconsin property.
Distinguishing Hail Damage from Normal Wear and Tear
One of the most common mistakes homeowners and inexperienced inspectors make is confusing normal, age-related weathering with storm damage. Filing an insurance claim for normal wear and tear can lead to a quick denial and an unnecessary claim on your record. Conversely, ignoring real storm damage because you think it is just "old age" can leave you footing the bill for a future roof replacement.

Understanding how to spot hail damage shingles requires a trained eye to separate physical impact from manufacturing anomalies and natural degradation. If you are wondering how to tell them apart, checking out real-world community discussions like How can you tell if your roof has hail damage? can provide helpful homeowner perspectives.
How to Spot Hail Damage Shingles vs. Blistering
Roof blistering is a manufacturing and ventilation issue, not storm damage. It occurs when moisture becomes trapped inside the shingle during manufacturing. When the roof heats up in the summer, this trapped moisture expands, pushing the asphalt upward and creating small, bubble-like blisters.
- Visual Differences: When a blister pops, it leaves a circular ring of missing granules. However, the exposed asphalt inside a popped blister is typically uniform, hard, shiny, and glazed. A hail strike, by contrast, physically fractures the shingle's internal fiberglass mat. The hit area will look dull, rough, and dark.
- The Tactile Test: If you gently press your thumb onto a blister, it will feel hard and solid underneath. If you press onto a hail hit, it will feel soft, spongy, and give way slightly under your finger, indicating that the underlying structure has fractured.
- Patterning: Blisters usually occur in clusters across the entire roof or are concentrated on poorly ventilated slopes. Hail damage is random and will only be found on the slopes that faced the direction of the wind-driven storm.
How to Spot Hail Damage Shingles vs. Normal Aging
As asphalt shingles age, they naturally lose granules and develop cracks. However, the physical characteristics of aged shingles are distinctly different from storm-damaged ones.
- Granule Loss: Normal weathering causes slow, widespread granule loss across the entire roof surface, often exposing the gray, oxidized asphalt beneath. Hail-induced granule loss is localized, circular, and exposes fresh, dark, unweathered asphalt.
- Cracking Patterns: Age-related cracking (often called thermal cracking) results in long, horizontal, vertical, or block-like cracks across the shingle tabs due to years of expansion and contraction. Hail cracks are small, localized, circular, or crescent-shaped fractures immediately surrounding an impact mark.
- Mechanical Damage: Scuffs from heavy foot traffic, falling tree limbs, or poor installation can mimic hail hits. However, mechanical damage usually has a scraping or dragging pattern, whereas hail hits are direct, downward impact marks.
Understanding these differences is crucial, especially when deciding whether to repair or replace. If your roof is older and experiencing widespread wear, it is important to address it correctly. To learn why shortcuts like layering new shingles over old ones should be avoided, read our guide on Why You Should Not Roof Over Existing Shingles.
The Insurance Claim Process: Test Squares and Replacement Criteria
If you suspect your roof has storm damage, navigating the insurance claim process can feel overwhelming. Insurance carriers use standardized, rigorous protocols to determine whether they will pay for a partial repair or a complete roof replacement.
The primary tool adjusters use is the "test square" method. A test square is a 10-foot by 10-foot area (100 square feet) marked out on a roof slope. The adjuster will inspect this square and count the number of legitimate, functional hail impacts inside it.

The Replacement Threshold
While policies vary, most insurance companies require a minimum of 8 to 10 legitimate hail hits within a 10ft x 10ft test square on at least three sides of the roof to approve a full roof replacement. If the damage is highly localized (for example, only on a small rear porch roof), they may only approve localized spot repairs.
Cosmetic vs. Functional Damage
This is a critical distinction in modern insurance policies.
- Functional Damage: This is damage that compromises the roof's water-shedding ability or shortens its expected lifespan. Examples include fractured fiberglass mats, split wood shakes, or punctured membranes.
- Cosmetic Damage: This refers to damage that alters the appearance of the roof but does not affect its performance or structural integrity, such as shallow dings on a metal roof or minor granule scuffs. In 2013, the American Association of Insurance Services introduced cosmetic damage exclusions, meaning some policies will not pay to repair dents on metal roofs or gutters if they still function properly.
RCV vs. ACV Policies
- Replacement Cost Value (RCV): An RCV policy covers the actual cost to repair or replace the damaged roof at current market rates, minus your deductible.
- Actual Cash Value (ACV): An ACV policy only pays the depreciated value of the roof based on its age. If you have a 15-year-old roof on an ACV policy, your payout will be significantly lower, leaving you to cover the remaining balance out-of-pocket.
To ensure your home is fully protected and that you receive a fair assessment, we highly recommend having a trusted local contractor present during the adjuster's inspection. If you are in Wausau, Stevens Point, or the surrounding areas, learn more about who to trust by reading Who Should I Call for Storm Damage Roof Repair in Wausau or Central Wisconsin.
Checklist: Steps to Document Your Hail Damage Claim
- Note the Date and Time: Document the exact date and approximate time the hailstorm hit your home.
- Take Scale Photos: Safely photograph hailstones next to a common object (like a quarter or a tape measure) to prove their size.
- Document Ground-Level Damage: Take wide and close-up photos of dented gutters, damaged siding, torn screens, and shredded plants.
- Save Local News Reports: Keep screenshots of local weather reports or NOAA storm data confirming hail in your specific ZIP code.
- Schedule a Professional Inspection: Contact a licensed, local roofing contractor to perform a thorough roof-level inspection and provide a detailed photo report.
- File Your Claim Promptly: Contact your insurance carrier to initiate the claim before your policy's filing window closes.
- Be Present for the Adjuster: Coordinate with your contractor so they can meet the insurance adjuster on-site and point out all documented damage together.
Repair vs. Replacement: Making the Right Decision for Your Home
Once the storm has passed and the damage is documented, the big question is: do you repair the damaged areas or replace the entire roof? Making the wrong call can lead to structural issues, voided warranties, and wasted money.
Several key factors will guide this decision:
- Age of the Roof: If your roof is relatively new (under 10 years old) and the hail damage is isolated to a single slope, a spot repair may be a practical and cost-effective option. However, if your roof is older than 12 to 15 years, spot repairs are generally a poor investment. Aged shingles become brittle, and trying to patch in new shingles can damage the surrounding weathered shingles, often causing the repair seams to fail within a few years.
- Extent of the Damage: If the hail was small (under 1 inch) and only caused minor, scattered granule loss, the structural integrity of your roof may still be intact. But if the hail was 1.25 inches or larger, or if the adjuster finds more than 8 to 10 hits per test square across multiple slopes, a full replacement is almost always the safest and most economical long-term choice.
- Warranty Concerns: Widespread hail damage can void your shingle manufacturer's warranty. Because manufacturers do not cover "Acts of God," leaving a hail-damaged roof unaddressed means you lose your warranty protection. A complete replacement restores your home's protection and secures a brand-new manufacturer's warranty.
- Upgrading to Class 4 Impact-Resistant Shingles: If you are replacing your roof, we highly recommend looking into Class 4 impact-resistant (IR) shingles. These shingles are engineered with rubberized SBS polymers that allow them to absorb hail impacts without fracturing. To achieve a UL 2218 Class 4 rating, these shingles must withstand a 2-inch steel ball dropped twice from a height of 20 feet. Many insurance carriers offer premium discounts for homes with Class 4 roofs, making them a smart investment for Wisconsin's volatile weather.
- Wind Resistance Expectations: Shingle performance varies by product, installation, ventilation, maintenance, and weather exposure. For example, typical architectural shingles offer excellent wind resistance, and some architectural shingles are rated up to 110 to 130 mph when installed as part of the required system.
If you are facing this decision, we can help you evaluate your options. Learn more about our approach to quality installations by reading our guide to Local Roof Replacement.
Pricing, Financing, and Energy Efficiency Considerations
When planning a roof replacement after a severe storm, understanding the financial landscape is essential. A standard residential roof replacement in Central Wisconsin typically runs from the upper four figures to the mid five figures. The final price depends on several factors, including your roof's total square footage, the pitch (steepness), the number of existing shingle layers to tear off, the condition of the underlying wood decking, the specific materials you choose, and local labor rates.
While minor repairs can address isolated issues, a complete roof replacement can cost thousands of dollars, and severe cases can cost much more. When comparing estimates, keep in mind that a lower price may reflect differences in materials, scope, cleanup, warranty coverage, or installation details.
To help make your home restoration project manageable, we offer flexible payment solutions. Financing options are available for qualifying homeowners. Loan amounts up to $100,000 unsecured may be available, with final approval, rates, and terms based on lender review and credit qualification.
Maximizing Your Project with Energy Efficiency Upgrades
If your roof is being replaced, it is the absolute perfect time to look at your home's overall thermal envelope. Improving your attic insulation and sealing air leaks can help lower your heating and cooling bills, help reduce the risk of winter ice dams, and extend the life of your new shingles by keeping your roof deck at a consistent, healthy temperature.
- Focus on Energy Rebates: Homeowners may qualify for Focus on Energy rebates. These rebates are specifically for qualifying insulation and air-sealing work (such as attic insulation, air sealing, wall insulation, foundation insulation, duct sealing, and qualifying DIY attic insulation and air sealing), not for the roof replacement itself. Because rebate amounts and eligibility rules change over time, we recommend confirming current program rules before starting your project.
- Federal Tax Credits (Section 25C): The Energy Efficient Home Improvement Credit (Section 25C) offers valuable tax incentives for energy-efficiency upgrades. Current IRS guidance shows this credit was available for qualifying improvements placed in service through December 31, 2025. Do not assume it is active for 2026 or beyond without checking current IRS updates, and always consult a qualified tax professional to verify your eligibility.
By combining your roof replacement with qualifying energy improvements, you can maximize your home's comfort and protection. Here are some of the key upgrades you should consider:
- Adding blown-in fiberglass attic insulation to meet modern R-value standards.
- Professional air sealing to stop warm, humid indoor air from escaping into your attic.
- Upgrading attic ventilation (intake and exhaust vents) to prevent shingles from baking in the summer.
- Installing robust ice and water shield membranes along valleys and eaves to help protect against water intrusion if ice dams occur, but they do not prevent ice dams by themselves.
Frequently Asked Questions about Roof Hail Damage
Does hail damage cause immediate roof leaks?
No, hail damage rarely causes immediate leaks unless the stones are massive (baseball-sized or larger) and physically puncture the roof deck. Instead, hail causes latent damage. By knocking away the protective ceramic granules, the impact exposes the underlying asphalt mat to UV radiation and Central Wisconsin's severe freeze-thaw cycles. Over the next 2 to 5 years, the exposed asphalt will dry out, crack, and rot, eventually leading to widespread water intrusion and structural mold. Ignoring hail damage because your ceiling isn't wet yet is a very risky gamble.
What size hail is required to damage a roof?
On average, it takes hailstones of 1 inch in diameter (the size of a quarter) or larger to cause functional damage to standard asphalt shingles. However, this threshold varies based on shingle durability and age. Older, brittle shingles can be damaged by 0.75-inch hail, especially when driven by high winds. Heavier architectural shingles commonly require 1.25-inch to 1.5-inch stones to fracture, while impact-resistant Class 4 shingles can easily withstand stones up to 2 inches in diameter.
How long do I have to file a hail damage insurance claim?
The window to file a claim depends on your insurance policy limits and state regulations. While some policies allow up to one or two years from the date of the storm, many carriers require you to report the damage within 180 days to one year. Because evidence like loose granules can wash away and exposed asphalt will weather over time, prompt reporting and detailed storm documentation are vital to getting your claim approved.
Conclusion
Spotting hail damage on your shingles is all about acting early, documenting thoroughly, and prioritizing safety. By keeping your feet on the ground and checking for collateral indicators like dented gutters and torn screens, you can safely gather the evidence you need to protect your home.
When it comes to climbing onto the roof and performing a detailed assessment, it is always best to leave it to the professionals. At A-RITE Exteriors, we specialize in roof-first, weather-resistant solutions designed to withstand Wisconsin's toughest winters and summer storms. Whether you are in Wausau, Stevens Point, Green Bay, or anywhere in Central Wisconsin, we are here to provide honest, detailed, and professional inspections to give you complete peace of mind.
If you suspect your home has sustained storm damage, don't wait for a leak to appear. Contact us today to schedule your professional inspection, and learn how we can help protect your home from top to bottom. For more information on how to keep your home comfortable and energy-efficient year-round, check out More info about insulation services.