How Do You Prepare Your Yard and Outdoor Property?
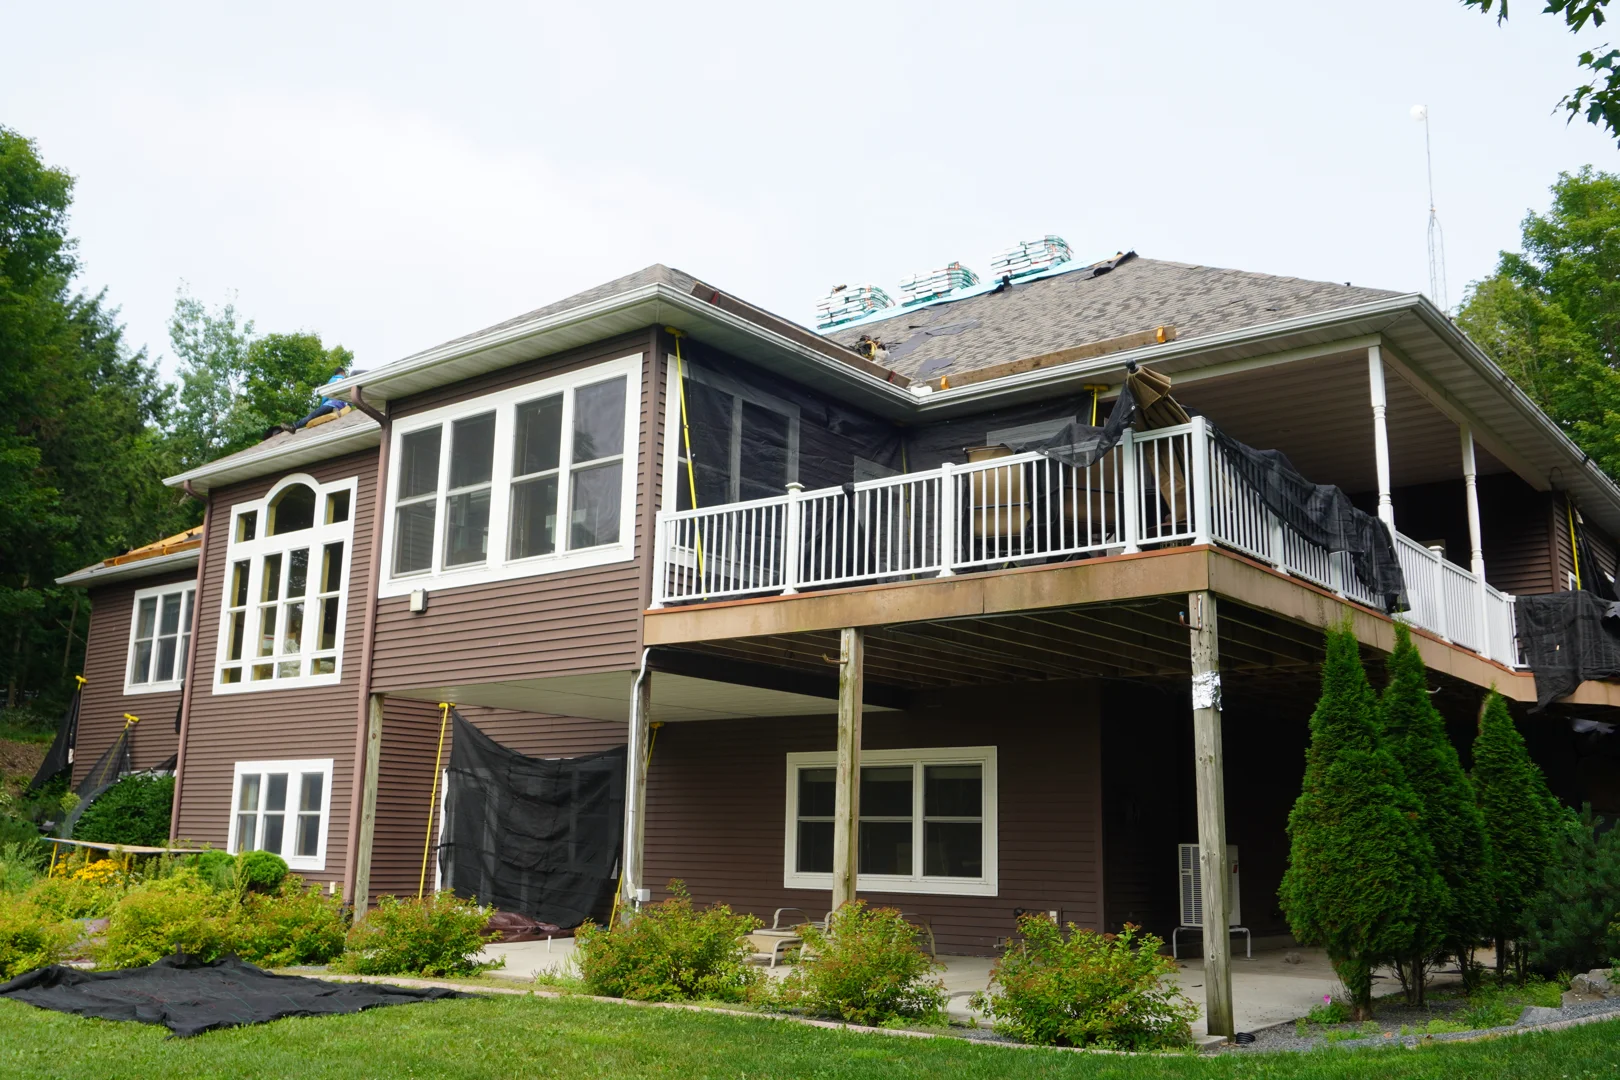
When a roofing crew arrives on site, your driveway and lawn instantly transform into an active construction zone. Heavy supply trucks deliver bundles of shingles, large roll-off dumpsters are parked near the eaves, and old roofing materials come cascading down from the roofline. Preparing your exterior property protects your landscaping, outdoor belongings, and personal vehicles from accidental damage.
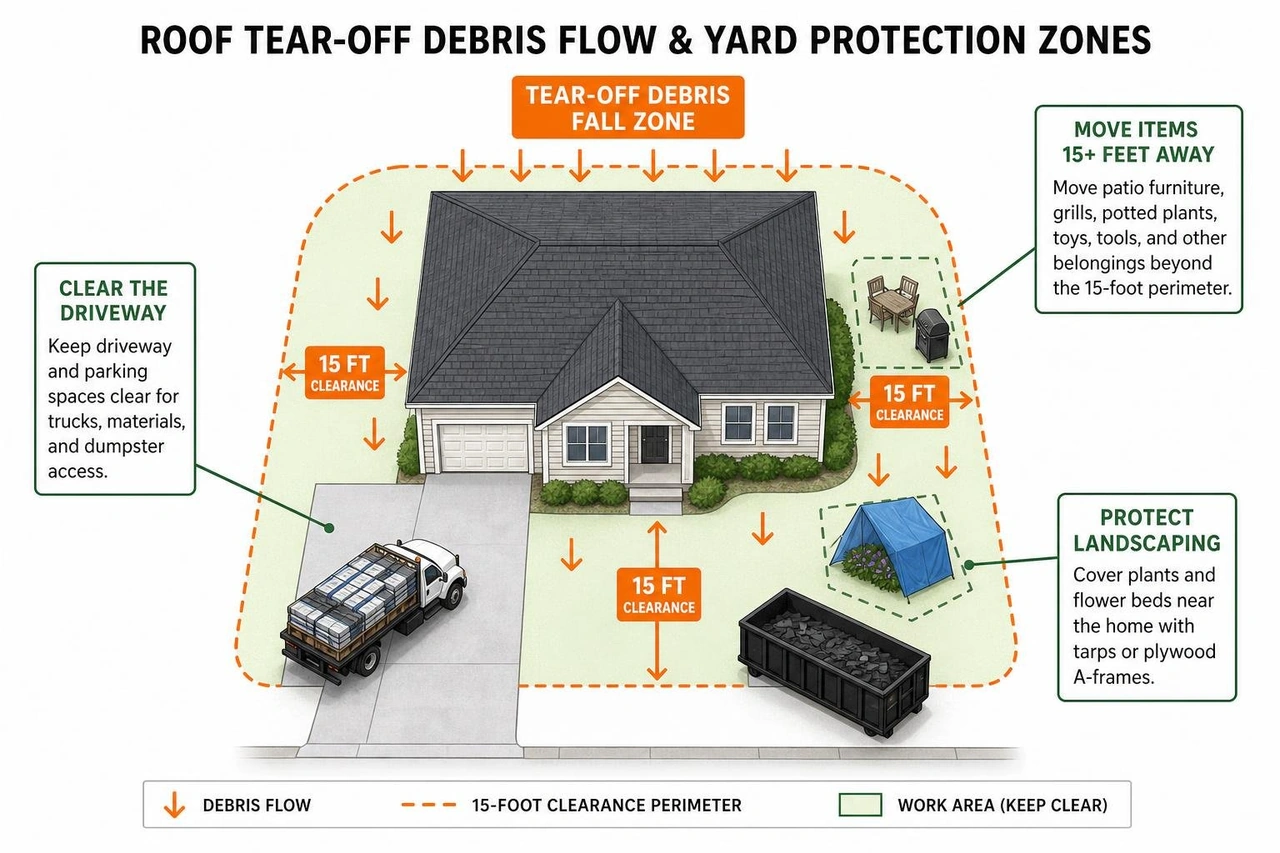
Clear the Driveway and Parking Spaces
The night before your installation begins, park all personal vehicles on the street well away from your driveway and garage. Delivery trucks carrying heavy material loads and tear-off dumpsters require full access to your driveway.
Parking on the street also guarantees your cars won't get blocked in when the crew arrives early in the morning. Furthermore, keeping vehicles far away from the house eliminates the risk of stray shingle debris, rogue nails, or airborne grit scratching your paint or puncturing tires.
Establish a 15-Foot Perimeter Clearance
Roof tear-offs generate falling debris on every side of your house. To keep your outdoor belongings safe and give installers a clear pathway, move all patio furniture, grills, potted plants, yard ornaments, lawn mowers, bicycles, and children's toys at least 15 feet away from the home's perimeter.
Storing these items inside a garage, shed, or far corner of the yard prevents shingle impact damage and keeps work areas free from tripping hazards.
Mow Your Lawn Short
Mowing your grass a day or two before the project starts is one of the most effective prep tricks homeowners often overlook. Short grass makes it exponentially easier for workers to spot dropped nails, staples, and small metal flashing scraps during visual checks and post-installation magnetic sweeps. Long grass hides nails, increasing the chance of a missed nail ending up in a lawnmower tire or a barefoot later on.
Protect Landscaping and Flower Beds
Falling asphalt shingles and old underlayment can crush delicate flowers and shrubbery. Cover sensitive bushes, flower beds, and ornamental plantings adjacent to the house with heavy-duty, breathable canvas tarps or plywood A-frames.
Avoid using non-breathable plastic sheets under direct sun, as trapped heat can scorch delicate greenery. Inform your project foreman about any prized plants so the crew knows to set up debris chutes or extra tarps in those specific areas.
Mark Hidden Hazards
If you have hidden property features near your foundation or across your lawn, identify them clearly before work begins. Use bright orange marking flags or stakes to flag:
- Sprinkler heads and drip irrigation lines
- Low-voltage landscape lighting
- Underground septic caps or utility lines
- Patios with sensitive slate or decorative pavers
- Water features such as koi ponds or fountains
Marking these areas ensures crews avoid stepping on delicate covers or placing heavy equipment over hidden utilities. You can review a complete exterior preparation checklist in our step-by-step preparation guidelines.
| Preparation Area | Exterior Preparation Tasks | Interior Preparation Tasks |
|---|---|---|
| Vehicle & Access | Park vehicles down the street; clear driveway for dumpster and material delivery trucks. | Keep entryways and pathways clear for emergency access if needed. |
| Protection | Cover delicate plants with canvas tarps; move patio furniture, grills, and toys 15+ feet away. | Remove framed wall art, mirrors, and shelf collectibles from upper-floor walls. |
| Attic & Storage | Move items out of uninsulated garages if structural roof gaps are present overhead. | Cover attic storage boxes and holiday decor with drop cloths or plastic sheeting. |
| Utilities & Safety | Turn off automatic sprinklers; test outdoor outlets; unlock side gates; flag hidden hazards. | Secure loose ceiling fans and light fixtures; set up white noise for pets. |
What Outdoor Logistics Need Attention Before Arrival?
- Turn Off Automatic Sprinklers: Deactivate your irrigation system the night before construction starts. Wet grass and muddy soil create slip hazards for workers carrying heavy loads and make nail retrieval much harder.
- Test Outdoor Power Outlets: Roofing crews frequently plug in extension cords for air compressors, power saws, and specialized equipment. Verify that your exterior GFI outlets are working properly. If an outlet trips or isn't functional, let your contractor know in advance so they can make alternative power arrangements.
- Unlock Side Yard Gates: Ensure all gates leading to your backyard or side lots are unlocked on installation morning. Installers need uninterrupted access around the entire perimeter of your home to move ladders, set up catch tarps, and perform ground cleanup.
How Can You Protect the Inside of Your Home and Attic?
A common misconception among homeowners is that roof replacement is strictly an exterior job that doesn't impact interior spaces. In reality, relentless hammering, pneumatic nail gun impacts, and heavy foot traffic overhead send significant vibrations down through your roof trusses, rafters, and interior framing.
Remove Fragile Wall Decor and Mirrors
Vibrations traveling through interior studs can easily shake loose hanging items on upper floors or walls sharing a roofline. Before the crew ascends your roof, take down:
- Framed family photos and paintings
- Wall-mounted mirrors and decorative clocks
- Floating wall shelves and loose collectibles
- Decorative plates or glass displays
Set these items safely on the floor in a padded area or store them inside closets until installation is complete.
Secure Ceiling Fans and Light Fixtures
Check ceiling fans, chandeliers, and pendant lights on your top floor. Tighten any loose mounting screws or globe covers. If you have antique glass light shades or delicate chandeliers directly below an vaulted ceiling, consider temporarily removing the glass shades to prevent them from vibrating loose during aggressive tear-offs.
For additional interior safety strategies, keep these guidelines in mind as you prepare your living areas.
How Do You Prepare Your Attic and Unfinished Garage?
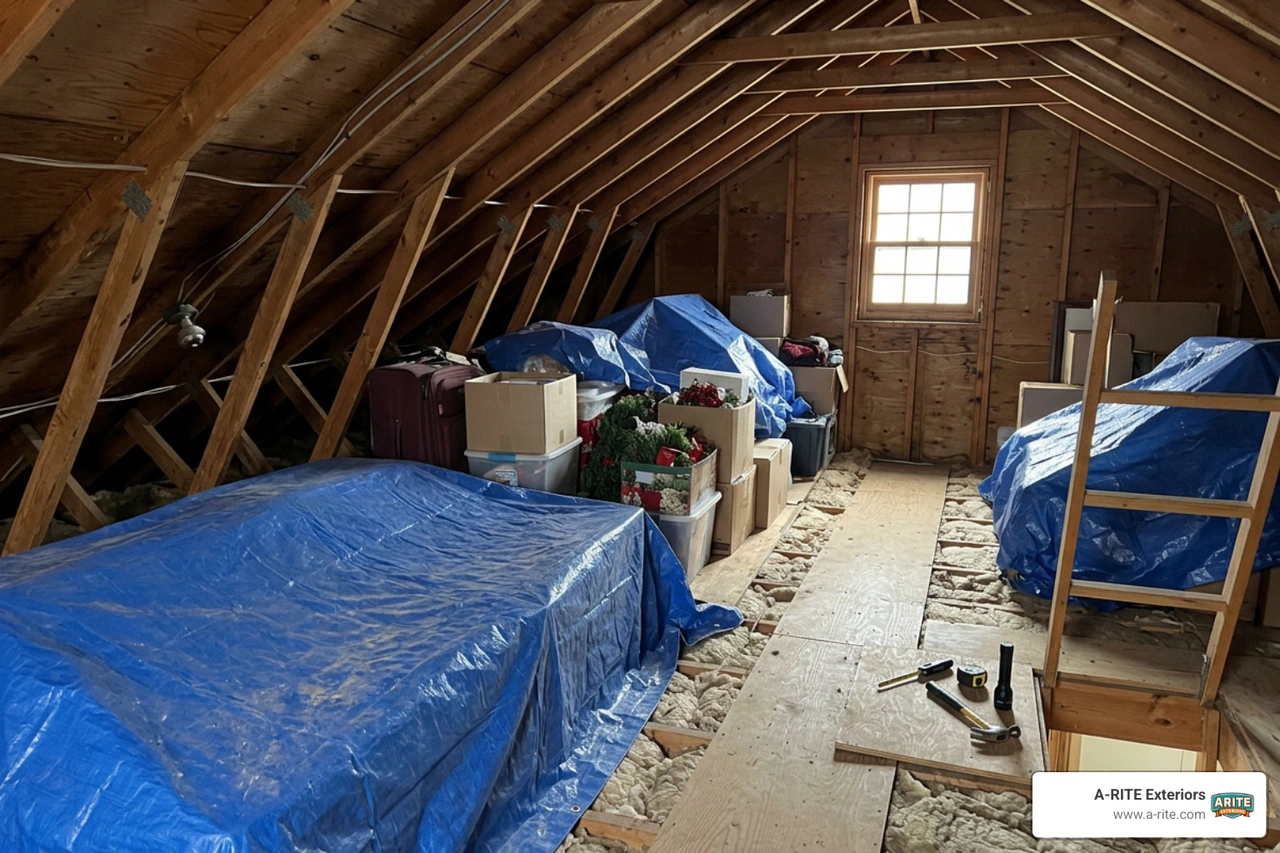
When old shingles and underlying felt paper are stripped away, small gaps between wood roof decking boards open up briefly. Sawdust, dried wood fibers, old shingle granules, and rust dust naturally filter down through those gaps into your attic space or uninsulated garage.
To shield your stored belongings:
- Cover Stored Belongings: Spread plastic drop cloths or old bedsheets over holiday decorations, clothes racks, memory boxes, and furniture stored in your attic.
- Protect Items in Uninsulated Garages: If your garage lacks a finished drywall ceiling, dust and tiny debris will fall directly onto anything parked or stored below. Move vehicles, lawn mowers, motorcycles, and open toolboxes out of the garage while the roof above is being torn off.
- Inspect Attic Decking and Ventilation: When you work with a certified GAF Master Elite Contractor like A-RITE Exteriors, our team doesn't just slap new shingles over old wood. During tear-off, we thoroughly inspect your roof decking for rotted boards and verify that your attic intake and exhaust ventilation balance meets strict building codes.
- Assess Attic Insulation: A roof replacement presents an ideal opportunity to review your home's thermal envelope. While on site, we can evaluate your attic insulation levels to ensure your home retains heat during cold Central Wisconsin winters.
Homeowners may qualify for Focus on Energy rebates for qualifying insulation and air-sealing work (such as attic insulation, air sealing, wall insulation, foundation insulation, duct sealing, and qualifying DIY attic insulation and air sealing), though these rebates apply specifically to qualifying insulation and air-sealing measures rather than the roof replacement itself.
Rebate amounts and eligibility rules change over time, and homeowners should confirm current program rules before starting work. Approved neutral sources for program details, rebates, tax guidance, and manufacturer standards include Focus on Energy, ENERGY STAR, the EPA, the IRS, USDA, Wisconsin DSPS, GAF, Owens Corning, and the BBB.
Regarding Federal tax credits like Section 25C (Energy Efficient Home Improvement Credit), IRS guidance showed it was available through December 31, 2025, and should not be presented as active for 2026 or beyond unless confirmed by current IRS guidance. We always recommend consulting a tax professional regarding any tax credits or financial incentives. A-RITE Exteriors provides attic insulation services and does not offer wall, foundation, or general insulation services beyond the attic space.
How Do You Prepare Your Children, Pets, and Household Routine?
Replacing a roof is an inherently noisy, high-activity process. The constant sound of tear-off shovels scraping across wood decking, pneumatic nailers firing, and workers walking overhead can create a chaotic environment for young children, anxious pets, and remote workers trying to focus.
Protect Children and Set Safety Boundaries
Active construction sites hold natural fascination for kids, but falling materials, sharp nails, and heavy equipment pose real dangers.
- Explain to your children that the yard is strictly off-limits while work is underway.
- Establish a safe exit route through a door furthest from active tear-off areas if you need to leave the house.
- Consider scheduling outdoor playdates, visits to local parks, or day trips to keep young children entertained away from construction noise.
Manage Remote Work Routines
If you work from home, prepare for intense noise levels during active work hours (typically starting as early as 7:00 AM). The rhythmic pounding overhead makes phone calls, video meetings, and deep concentration exceptionally difficult.
Plan to work off-site at a local library, coffee shop, or family member's home during the heaviest tear-off phases. If you must remain home, set up your workstation on the lowest level of the house in a room away from the roofline.
Keep Pets Safe and Calm
The loud overhead banging can cause severe anxiety in dogs and cats, leading to stress-induced behaviors or attempts to bolt.
- Set Up a Safe Room: Place your pet in a basement or windowless interior room on the lowest floor. Provide their favorite bed, familiar toys, food, and water.
- Use Noise Masking: Run a white noise machine, box fan, or TV at a moderate volume to help drown out construction thuds overhead.
- Prevent Escape Risks: Roofing crews frequently open and close side yard gates throughout the day. Never leave dogs unattended in the yard during construction. Keep pets on a leash when taking them outside for potty breaks.
- Consider Off-Site Daycare: If your pet experiences extreme noise aversion, booking a stay at a local pet daycare or leaving them with a neighbor for the day is often the kindest, stress-free choice.
You can learn more about managing family routines during major exterior renovations with proper advance planning.
What Should You Do Regarding Neighbors, Roof Accessories, and Utilities?
Roof replacements affect the immediate neighborhood. Open communication before work starts maintains great relationships with your neighbors and prevents unexpected logistical snags on installation day.
Notify Your Immediate Neighbors
Give your adjacent neighbors a friendly heads-up 3 to 5 days before your project begins. Let them know:
- The planned start date and estimated duration of the project
- That crew trucks and material deliveries may briefly increase street parking or block access points
- That high noise levels will start early in the morning
If a neighbor has a driveway directly adjacent to your home, suggest they park their cars down the block or inside their garage to shield them from drifting dust or stray shingle debris.
Request Property Access Permission
During high winds, small scraps of old felt paper or shingle granules might occasionally drift across property lines into a neighbor's yard. Ask your neighbors for permission in advance for our cleanup crew to step onto their property or lawn to perform magnetic nail sweeps and pick up stray debris once the job wraps up.
Plan for Roof Accessories and Attachments
Your roof deck often supports extra equipment that requires careful handling before and during replacement:
- Satellite Dishes: Most roofing contractors remove satellite dishes mounted directly to shingles. However, roofers generally do not re-calibrate satellite signals. Contact your satellite service provider prior to installation day so a technician can quickly re-align your dish once the new roof is in place.
- Solar Panels: Solar arrays must be safely powered down, unbolted, and removed by a qualified solar installer before roof tear-off begins, then reinstalled after the new system is completed.
- Skylights: Old skylights should be inspected during roof replacement. Replacing aging skylights alongside your roof prevents leaks and ensures seamless flashing integration.
- Chimney Flashing: Custom metal flashings around brick chimneys must be replaced and counter-flashed into mortar joints to guarantee a watertight seal against rain and melting snow.
When choosing a replacement roof system, selecting climate-tested materials is essential. Discover how modern roof assemblies withstand severe northern winters by reading our guide on What is the best roofing system for Wisconsin weather.
What Happens on Replacement Day and How Do You Handle Post-Installation Cleanup?
Knowing what happens step-by-step on installation day takes the stress out of the process. Here is what you can expect from start to finish when working with a professional crew.
1. Early Morning Setup and Dumpster Placement
The crew typically arrives early in the morning. The foreman sets up safety equipment, places heavy-duty drop tarps around your home's foundation, and positions the disposal dumpster near the roof overhangs for efficient tear-off disposal.
2. Complete Roof Tear-Off
Installers strip away old asphalt shingles, worn underlayment, damaged ice and water shield, and old metal flashings down to the bare roof decking.
3. Decking Inspection and Structural Repairs
Once the old materials are removed, the foreman inspects every wood deck board. Any rotted, delaminated, or water-damaged plywood sheathing is removed and replaced with fresh, solid wood deck boards to establish a sound structural foundation.
If hidden structural water damage or rotten decking goes unaddressed, subsequent interior water damage repairs can cost thousands of dollars, and severe cases can cost much more. Identifying and fixing deck rot during tear-off permanently resolves underlying moisture issues.
4. Installation of Underlayment, Flashing, and Shingles
Our crew installs high-performance ice and water shields along eaves and valleys, lays down heavy-duty synthetic underlayment, integrates custom drip edges, and installs new asphalt shingles using precise, manufacturer-specified nailing patterns.
When upgrading your roof system, some architectural shingles are rated up to 110 to 130 mph when installed as part of the required system, though actual wind resistance and shingle lifespan vary by product, installation, ventilation, maintenance, and weather exposure.
5. Final Quality Inspection and Magnetic Cleanup
Once the final ridge cap shingles are fastened, the project foreman conducts a thorough ground and roof walkthrough. The crew sweeps all gutters clean, removes perimeter catch tarps, and runs rolling magnetic nail sweepers over your lawn, driveway, flower beds, and walkways multiple times to pick up stray nails and staples.
Before returning patio furniture or releasing pets into the yard, join the foreman for a final walkthrough to review the completed roof, check the surrounding property, and confirm that all cleanup meets your expectations.
You can learn more about local installation standards by reading our resource on Local Roof Replacement or exploring our full range of professional Roofing Services.
What Are the Most Frequently Asked Questions About Roof Replacement Prep?
Do roofers need to enter the inside of my home during a roof replacement?
In almost all cases, no. Roofing installers work strictly on the exterior of your house. However, if your roof replacement involves installing new skylights, repairing structural framing, or adjusting attic ventilation chutes, a technician may request brief access to your attic space or top-floor ceiling area. Keeping entryways clear makes those brief visits simple and efficient.
Should I stay home during my roof replacement project?
You are not required to stay home while your roof is being installed, and many homeowners prefer to leave for the day to avoid the intense noise. However, we recommend staying reachable by phone throughout the day. If our tear-off crew uncovers hidden deck rot or damaged structural framing beneath old shingles, the foreman will call you promptly to explain the situation, present repair options, and get your approval before moving forward.
How long does a standard residential roof replacement take?
For most standard single-family homes, a full roof replacement takes between 1 and 3 days. The exact timeline depends on the overall square footage of your roof, its architectural complexity and pitch, the number of old shingle layers being torn off, weather conditions, and whether structural deck board repairs are required.
What Are Your Next Steps to Ensure a Smooth Roof Replacement?
Preparing your house for a roof replacement doesn't have to be overwhelming. By breaking your preparations into actionable steps, such as clearing your driveway, removing interior wall art, protecting your attic storage, and keeping pets and kids safe, you set the stage for a seamless, stress-free installation project.
When you partner with experienced local specialists who prioritize clean job sites, clear communication, and weather-resistant craftsmanship, your home remains protected every step of the way.
If you are planning your exterior project budget, financing options are available for qualifying homeowners. Loan amounts up to $100,000 unsecured may be available, with final approval, rates, and terms based on lender review and credit qualification.
When comparing estimates from local contractors, keep in mind that a lower price may reflect differences in materials, scope, cleanup, warranty coverage, or installation details. In general, typical residential roof replacement costs across Central Wisconsin vary, with overall project scope ranging from upper four figures to mid five figures depending on roof size, pitch, number of shingle layers, decking condition, selected materials, and labor.
Ready to upgrade your home's roof with trusted local experts? Get a quick estimate today by using our easy Instant Roof Quote tool, or connect directly with our friendly team on our Contact Us page to schedule your personalized roof consultation!