When a Roof Leak in Heavy Rain Catches You Off Guard
A roof leak in heavy rain, or during snowmelt, is one of the most stressful things a homeowner can face. Water is coming in, and you're not sure where it's starting, how bad it is, or what to do first.
Here's a quick answer to the most urgent questions:
If your roof is actively leaking right now:
- Place a bucket under every drip, and put a towel or tarp underneath to protect your floors
- Move electronics, rugs, and furniture out of the wet zone
- Turn off power at the breaker if water is near any light fixture or outlet
- If your ceiling is bulging, carefully poke a small hole at the lowest point to release trapped water in a controlled way
- Go into the attic (if safe) and trace the wet trail uphill to find the entry point
- Document everything with photos and video before you move anything
- Call a licensed roofer; do not climb onto a wet or snow-covered roof yourself
Why does this happen? Light rain may never expose a weak spot on your roof. But heavy rain, or snowmelt backed up behind an ice dam, creates volume, pressure, and lateral water movement that pushes moisture into places it was never supposed to reach. A small vulnerability that's been hiding for years can suddenly become a visible leak.
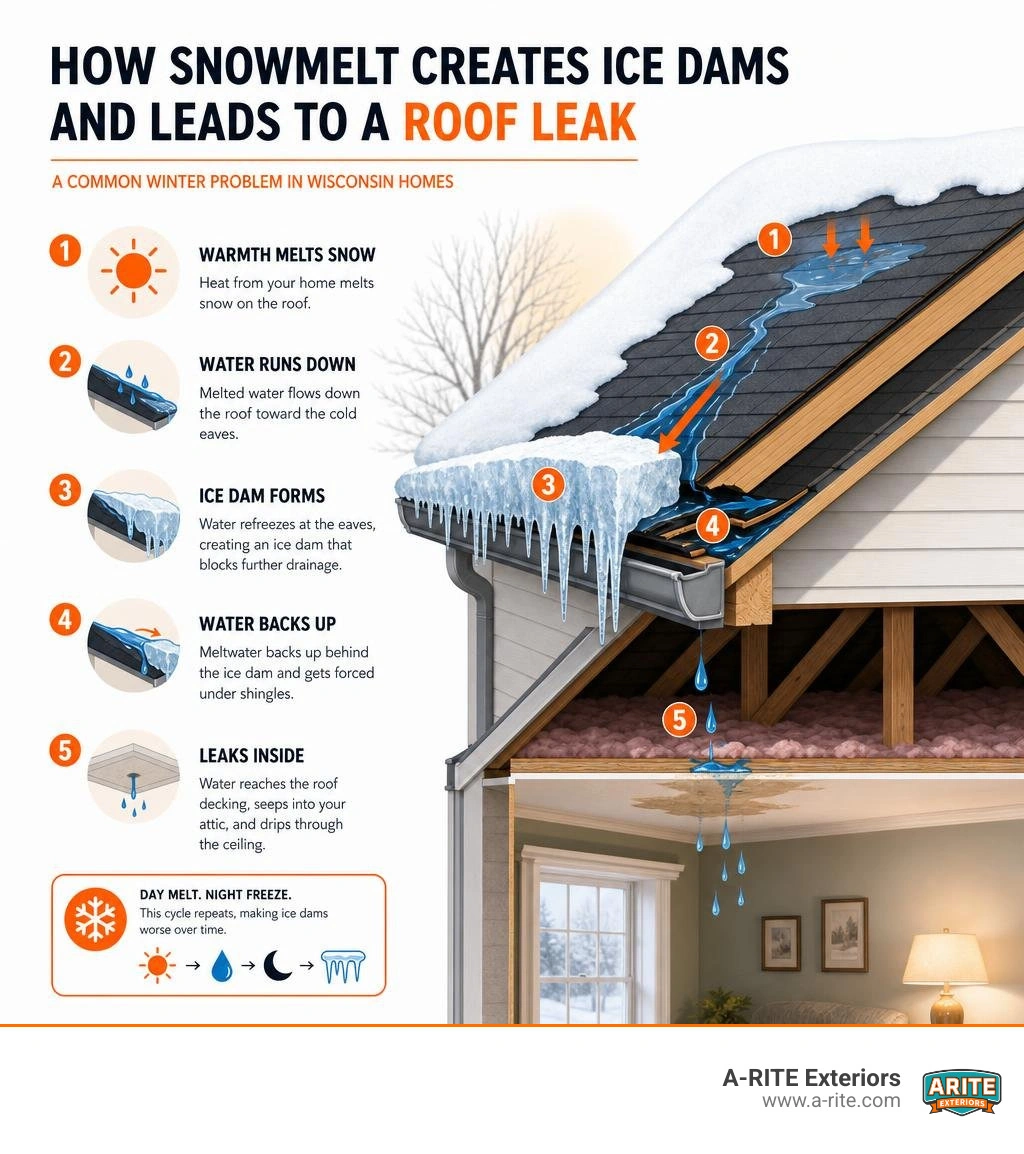
In Wisconsin, this problem is especially common in late winter and early spring, when snow thaws during the day and refreezes at night. That cycle builds ice dams along the eaves, forces water backward under shingles, and sends it straight into your attic and ceiling.
I'm Bryan Londerville, founder of A-RITE Exteriors, and I've been helping Central Wisconsin homeowners diagnose and fix roof leaks in heavy rain and winter weather since 2002. In that time, I've seen how quickly a small leak, caught early, can become a major structural and mold problem when it's ignored or misdiagnosed. The guide below will walk you through exactly what's happening, what to do right now, and how to prevent it from happening again.
Basic roof leak in heavy rain terms:
The Connection Between Heavy Snow, Ice Dams, and a Roof Leak in Heavy Rain
When Central Wisconsin transitions from freezing winter temperatures to spring-like downpours, our roofs undergo incredible stress. Many homeowners are surprised to find that a roof leak in heavy rain during April actually had its roots in the heavy snows of January and February. The culprit behind this delayed reaction is the classic freeze-thaw cycle and the formation of ice dams.
An ice dam forms when heat escaping from your living space warms the roof deck, melting the bottom layer of snow on your roof. This snowmelt flows down the slope until it reaches the cold eaves, which overhang the exterior walls of your home. Because the eaves are not exposed to interior heat, they remain at freezing temperatures. The water refreezes at the edge, building a thick barrier of ice.
As more snow melts, water backs up behind this ice barrier. This standing pool of water cannot drain into your gutters. Instead, it sits directly over your shingles, creating continuous moisture exposure that typical roofing systems are not designed to handle. Shingles are designed to shed water downward using gravity; they are not a waterproof pool liner.
When water pools behind an ice dam, it can lift shingles and degrade the underlying underlayment. When the next heavy rainstorm hits, or when temperatures rise rapidly, this compromised system allows water to bypass your primary defense line entirely. Heavy storms excel at finding these exact structural weaknesses, forcing water into vulnerable areas.
How Snowmelt Mimics a Roof Leak in Heavy Rain
The physics of water behavior on a roof change completely when gravity is removed from the equation. During a normal, light rain shower, water flows straight down the pitch of your roof and off the edge. However, when snowmelt accumulates or heavy downpours overwhelm your roof's drainage paths, hydrostatic pressure builds.
This pressure forces water to travel laterally, often moving horizontally or even uphill under your shingles. In fact, water can travel laterally under shingles up to 2 feet before finding a seam in the wood decking and leaking through into your home. This horizontal movement is why a water stain on your living room ceiling is rarely directly beneath the actual entry point on your roof. Water can strike a roof surface, travel along rafters, bypass standard gravity-based barriers, and drip down far from where it entered.
Additionally, we often see the "rebound effect" near roof penetrations. During intense downpours, water can bounce upward under static vent covers, dropping directly into the open vent pipe. This phenomenon occurs when wind-driven moisture forces its way past standard ventilation structures during intense storms.
Why Clogged Gutters and Ice Dams Overwhelm Your Roof
Properly sloped, clean gutters help manage runoff and direct water away from the roofline and foundation, serving as key components of your roof's water management system. However, when they are packed with pine needles, autumn leaves, or frozen slush, they fail to do their job.
During heavy rain or rapid snowmelt, clogged gutters cause water to back up. Instead of spilling harmlessly over the front edge of the gutter, the backed-up water rises up and over the back edge. This places standing water in direct contact with your fascia boards, soffits, and the very edge of your roof deck.
Over time, this constant saturation leads to fascia rot and soffit damage, allowing water to rot the structural wood of your roof's eaves. Once the wood softens, water easily enters your home near the roofline, dripping down interior walls and ruining drywall.
Common Causes of Winter and Spring Roof Leaks
A roof leak in heavy rain is rarely caused by a random hole in the middle of your shingles. Instead, water finds the weak points where the continuous shingle field is interrupted, such as valleys, chimneys, vents, and skylights.
Understanding where these vulnerabilities lie can help you troubleshoot the issue before calling in our team for a permanent fix.
| Common Leak Source | Estimated Frequency of Occurrence | Primary Indicators Inside the Home |
|---|---|---|
| Chimney Flashing | ~28% | Water stains on walls near the fireplace, damp masonry, musty smells in the fireplace area |
| Valleys & Roof Intersections | ~22% | Ceilings stains along the slope transitions, active drips in central rooms |
| Plumbing Vent Boots | ~18% | Stains in bathrooms or hallways, dripping near plumbing stacks |
| Skylight Flashing | ~12% | Water dripping directly from the skylight frame, bubbling paint around the drywall casing |
| Ice Dam Backflow | ~10% (Winter/Spring) | Stains along exterior walls, ice buildup on siding, wet insulation at the eaves |
| Shingle Field Damage | ~10% | Isolated ceiling stains, visible missing shingles from the ground |
Damaged Flashing and Valley Vulnerabilities
Roof valleys are the areas where two sloped sections of your roof meet to form a "V" shape. Because of their design, valleys handle a significantly higher volume of water runoff than flat roof planes. This makes them highly susceptible to wear and leaks during heavy downpours or rapid snowmelt.
Flashing, the thin metal strips installed around chimneys, dormers, and roof intersections, is another common failure point. Step flashing must be layered perfectly with shingles to shed water. If the flashing is bent, rusted, or if the sealant has failed, water will bypass the shingles. Chimney flashing is especially notorious; porous bricks and cracked chimney crowns can absorb water during long storms, weeping moisture directly into your attic even if your shingles are in perfect condition.
Cracked Pipe Boots and Vent Failures During a Roof Leak in Heavy Rain
Plumbing vent pipes project through your roof to vent sewer gases. To keep water out, roofers install a plumbing vent boot, which is a flashing piece with a rubber or neoprene collar that fits tightly around the pipe.
Unfortunately, these neoprene collars typically split after 10 to 15 years of intense UV exposure and extreme Wisconsin temperature swings. When the rubber cracks or pulls away from the pipe, water runs straight down the outside of the pipe and into your home.
During heavy rain, this small gap becomes a direct conduit for water, as sealants rapidly degrade under harsh storm conditions.
Immediate Emergency Steps to Take During an Active Leak
If you notice water dripping from your ceiling during a storm, panic is your worst enemy. Taking immediate, structured action can prevent a simple roof repair from turning into an expensive interior restoration project.

When water enters your home, follow this immediate emergency checklist:
- Contain the Water: Place a bucket, plastic bin, or deep pot directly under the drip. To prevent water from bouncing off the rim of the bucket and damaging your hardwood floors or carpets, place an old towel or a trash bag underneath the container.
- Move Valuables: Clear the area of electronics, furniture, rugs, and family heirlooms.
- Turn Off Power: If the leak is near light fixtures, outlets, switches, or your breaker box, turn off the electricity to that zone immediately. Do not touch wet electrical fixtures.
- Document Everything: Take a quick video and several photos of the active leak, the ceiling damage, and any affected belongings. This documentation is vital for insurance purposes.
- Trace the Source: If you can safely access your attic, do so. Carry a flashlight and step only on solid framing members (joists), never on attic insulation or drywall, or you will fall through the ceiling. Trace the water trail uphill to find its entry point and mark it with painter's tape.
How to Safely Drain a Bulging Ceiling
When water leaks through your roof, it often pools on top of your ceiling drywall. Drywall is highly porous; a single square foot of saturated drywall can hold 2 to 3 gallons of water. As water accumulates, the drywall will begin to sag and bulge.
A four-square-foot ceiling bulge can hold up to 12 gallons of water, weighing roughly 100 pounds. This weight poses a severe risk of sudden, catastrophic ceiling collapse, which can cause major injuries and widespread property damage.
To prevent a collapse, you must drain the water in a controlled way:
- Place a large bucket directly underneath the bulge.
- Take a long screwdriver or a drill with a small bit.
- Stand to the side (not directly underneath) and carefully poke a half-inch hole right in the center of the bulge.
- The trapped water will drain into your bucket, relieving the pressure and saving your ceiling structure.
Tracing the Leak Source Safely from the Attic
Finding where water is entering your attic during an active storm is much easier than finding it on a dry day. Water reflects light, making wet wood and dripping paths highly visible under a strong flashlight beam.
When you enter the attic, use the "uphill rule." Start directly above the ceiling stain inside your home. Look up at the underside of the roof deck. If you see a wet streak on a rafter, follow that wet trail upward toward the ridge. Water often enters near a vent or chimney and runs down a rafter for several feet before dripping onto your insulation.
Once you locate the entry point, mark it with painter's tape or write down its position relative to a chimney or vent so our repair crew can find it easily. Never attempt to climb onto your roof during a storm to apply tarps or temporary patches. Wet shingles are incredibly slick, and high winds make roof work extremely dangerous.
Permanent Repairs, Insulation, and Financial Considerations
Once the storm passes and your home is stabilized, it is time to transition from temporary containment to permanent, weather-resistant solutions.
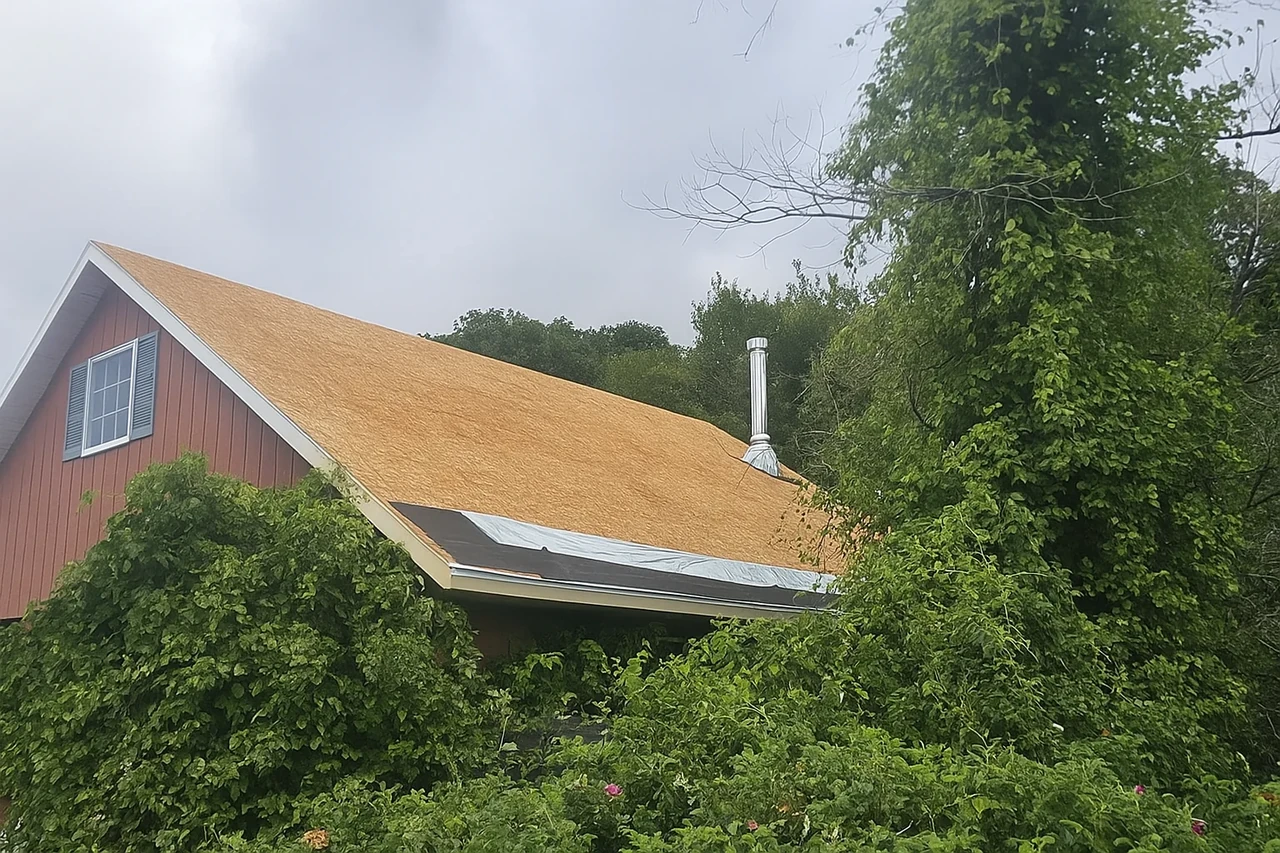
A permanent repair is mechanical first and chemical second. This means we do not simply smear roof cement over a leak. Roof cement shrinks, cracks, and traps moisture, which accelerates wood rot. Instead, a proper repair involves removing the surrounding shingles, replacing any rotted wood decking, installing a self-adhering ice and water shield (which helps protect against water intrusion if ice dams occur, but does not prevent ice dams by itself), and weaving in new flashing and shingles.
The Role of Attic Insulation and Ventilation in Preventing Ice Dams
If you want to help address winter roof leaks, you have to look beneath the shingles. The root cause of ice damming is a warm attic space. When heat from your living areas escapes into your attic, it warms the roof deck and melts the snow above.
To help keep your roof deck cold and reduce the risk of ice dams, your home needs a balanced combination of attic insulation and proper ventilation:
- Attic Insulation: High R-value insulation acts as a barrier, keeping your heat inside your living spaces where it belongs.
- Air Sealing: Sealing thermal bypasses, such as gaps around attic hatches, light fixtures, and plumbing pipes, helps prevent warm air from leaking into the attic.
- Ventilation: Intake vents (soffits) and exhaust vents (ridge vents) must work together to create a continuous flow of cool outdoor air through your attic, keeping the roof deck at a uniform, cold temperature.
Financing, Rebates, and Tax Credit Guidelines for 2026
We believe that protecting your home from severe weather should be accessible and affordable. That is why we offer flexible options to help you manage the cost of these critical improvements.
Financing options are available for qualifying homeowners. Loan amounts up to $100,000 unsecured may be available, with final approval, rates, and terms based on lender review and credit qualification.
Additionally, homeowners may qualify for Focus on Energy rebates. Please note that these rebates are specifically designed for qualifying insulation and air-sealing work (such as attic insulation, air sealing, wall insulation, foundation insulation, duct sealing, and qualifying DIY attic insulation and air sealing), rather than for the roof replacement itself. Because rebate amounts and eligibility rules change over time, we always recommend confirming current program rules before starting your project.
If you are looking into tax credits, keep in mind that current IRS guidance shows the Section 25C Energy Efficient Home Improvement Credit was available for qualifying improvements placed in service through December 31, 2025. It is not currently presented as an active credit for 2026 or beyond unless updated IRS guidance confirms an extension. We highly recommend consulting a qualified tax professional to review your eligibility for any federal tax incentives.
Frequently Asked Questions About Winter Roof Leaks
Does homeowners insurance cover roof leaks caused by heavy snow or rain?
Generally, homeowners insurance covers roof leaks if they are caused by a sudden, accidental, and unpreventable storm event. Examples include:
- High winds lifting shingles during a severe storm.
- A fallen tree limb puncturing your roof deck.
- Severe hail damage that compromises your shingles.
However, insurance policies typically exclude damage caused by gradual wear and tear, lack of maintenance, or old age. If your roof leaks because your plumbing boot cracked after 15 years of service, or because you ignored clogged gutters for several seasons, your claim will likely be denied.
Always document the storm event with local weather reports and photos of the immediate damage to support your claim.
How long can a roof leak go before causing serious structural damage or mold?
The clock starts ticking the moment water enters your home. According to the IICRC S500 standard (the industry standard for water damage restoration), mold can establish and begin growing within 24 to 48 hours of moisture saturation.
If a leak is left unaddressed for even two weeks, a simple roof repair can escalate into a major project involving structural wood rot, ruined insulation, and extensive mold remediation. Saturated framing members must be dried down to below 15% moisture content using industrial dehumidifiers and air movers to prevent structural decay.
Can I temporarily patch a roof leak from inside the attic during a storm?
We strongly advise against spraying expanding foam, applying caulking, or smearing roofing cement from the inside of your attic during a storm.
While it might seem like a quick way to stop a drip, these materials do not stop the water from entering your roof deck. Instead, they simply trap the water inside the wood framing and insulation. This trapped moisture accelerates wood rot, ruins your decking, and makes it much harder for our professional repair crew to locate and fix the true source of the leak once the weather clears. Keep using buckets and shunting water from the inside until a professional can safely apply a temporary tarp to the exterior.
Conclusion
A roof leak in heavy rain or snowmelt is a clear warning sign that your home's exterior defense system is compromised. Whether your leak is caused by ice dams, failed valley flashing, or an aging plumbing boot, ignoring the issue will only lead to more extensive and costly damage down the road.
At A-RITE Exteriors, we specialize in building weather-resistant solutions designed to withstand the harshest Central Wisconsin winters and spring storms. From Wausau and Stevens Point to Minocqua and Green Bay, our experienced, safety-conscious crews are ready to help you protect your home. Trust the Hawk on Your Block to deliver permanent, professional repairs and high-performance insulation upgrades.
If you suspect your attic insulation or ventilation is contributing to ice dams and winter leaks, explore our professional services for More info about insulation services and schedule a comprehensive inspection with us today.